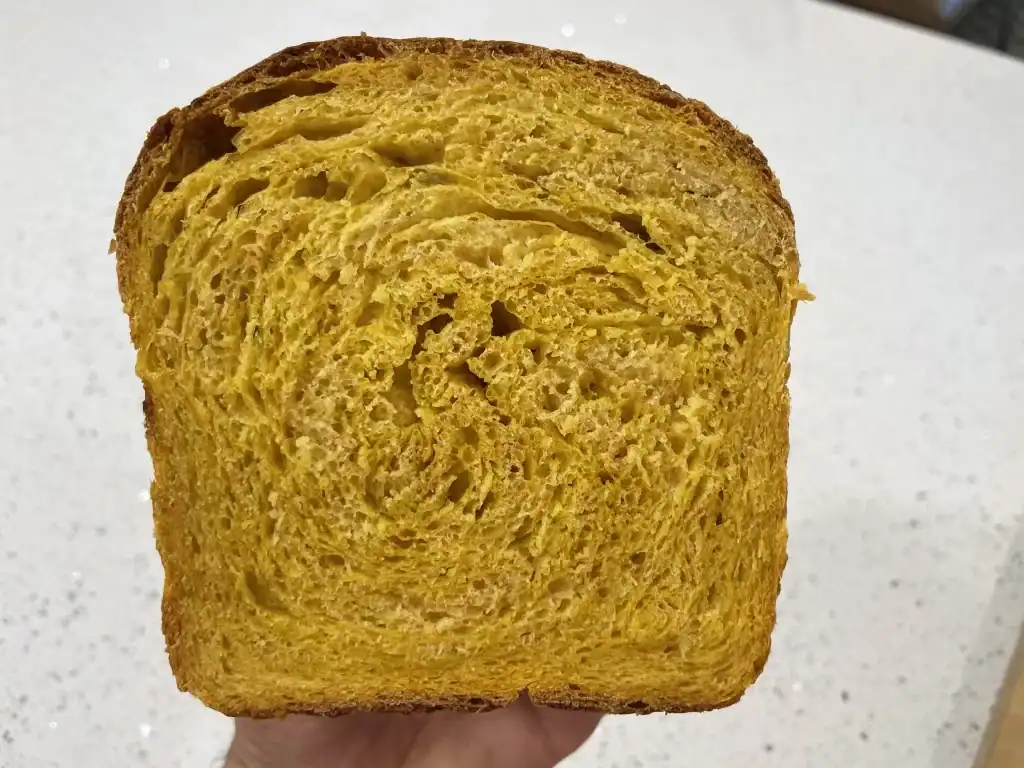
This sourdough pumpkin sandwich bread is a soft and fluffy enriched bread (similar to brioche) that has a beautiful orange color and mild pumpkin flavor from the addition of pumpkin puree. This seasonal sandwich bread is also naturally leavened with sourdough starter instead of commercial baker’s yeast. It’s a perfect fall sourdough bread for home bakers.
Why This Recipe Works
Using pumpkin puree in a bread recipe adds both moisture and starchiness to the dough. Pumpkin is great for adding color and flavor, but when you add it to a bread dough, both the flour and water content of the dough have to be adjusted accordingly.
The dough for this recipe is similar to my popular soft sourdough sandwich bread recipe, but it replaces a portion of the flour and water/milk with 100% pumpkin puree. The proportions of ingredients are perfectly balanced so that the dough remains easy to work with, and the resulting bread is beautifully orange, packed with flavor, and still soft, fluffy, and sweet like the original sandwich bread. Essentially, this is a perfect, eye-catching, sourdough pumpkin sandwich bread to make during the fall season.
Ingredients You’ll Need
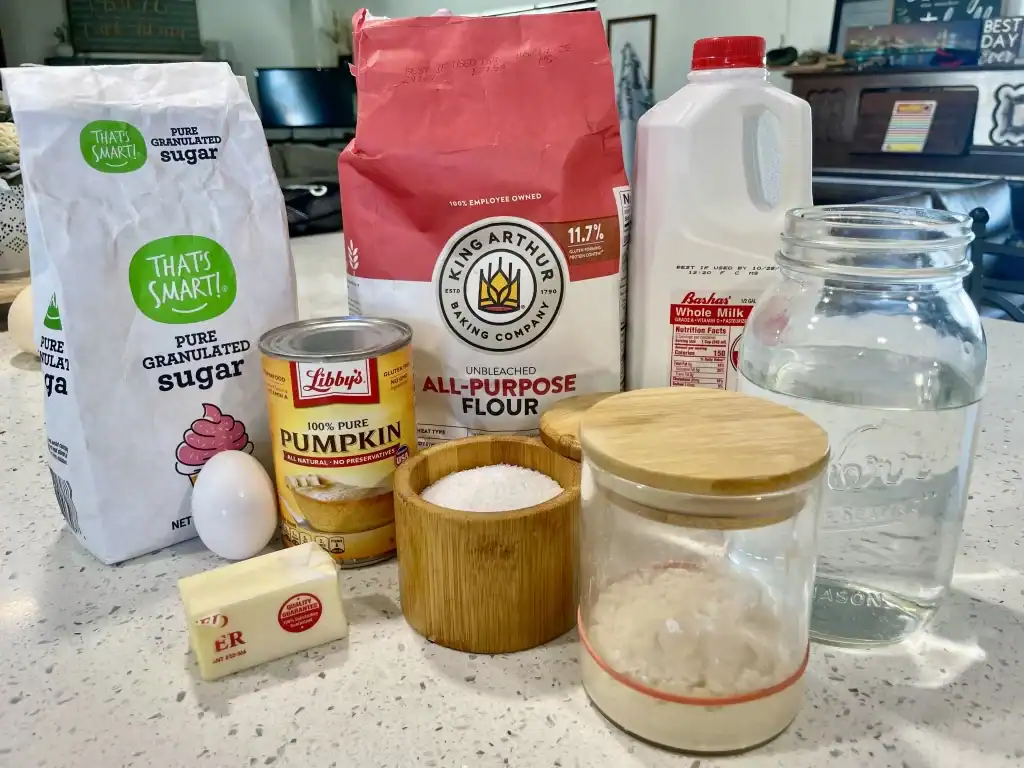
- All-Purpose Flour: Any type of white all-purpose flour or bread flour should work fine for this recipe. I used King Arthur brand of all-purpose flour in the red bag, but anything labeled “all-purpose flour” or “bread flour” should work great.
- Pumpkin Puree: Use fresh or canned 100% pumpkin puree, not pumpkin pie filling.
- Water: Ideally, use unchlorinater tap water or bottled spring water.
- Milk: I prefer to use whole milk for this recipe because of the richness it brings to the dough.
- Sourdough Starter: I use a 100% hydration sourdough starter fed with bread flour. You could use a similar starter fed with whole wheat flour as well.
- Butter: I used salted butter for this recipe, but unsalted butter will work too. This additional salt in the salted butter won’t make a noticeable difference in the bread.
- Sugar: White sugar will bring a touch of sweetness and softness to this bread without altering the orange color.
- Salt: Kosher salt, sea salt, or plain table salt work well. Avoid using iodized table salt.
- Egg (Optional): This recipe calls for adding an “egg wash” to the loaf before baking it. This is an optional but recommended step that requires just one egg.
Note: Check recipe card below for full ingredient amounts and quantities.

Suggested Timeline: Sourdough Pumpkin Sandwich Bread
| Time | Step |
|---|---|
| 3:00 PM (Day 1) | Feeding the Sourdough Starter |
| 9:00 PM | Mixing the Dough |
| 9:30 PM | Stretch and Folds (and Adding the Butter) |
| 10:30 PM | The First Rise (Bulk Fermentation) |
| 6:00 AM (Day 2) | Pre-Shaping and Final Shape |
| 6:30 AM | The Second Rise (Final Proof) |
| 11:30 AM | Baking |
Ingredient Amounts
Sourdough Starter Feeding
- Sourdough Starter, leftover – 25 grams
- Bread Flour or All-Purpose Flour – 50 grams
- Water – 50 grams
Main Dough
- All-Purpose Flour – 450 grams
- Pumpkin Puree – 200 grams
- Milk – 100 grams
- Water – 50 grams
- White Sugar – 25 grams
- Sourdough Starter, active – 100 grams
- Salt – 10 grams
- Butter – 54 grams
Egg Wash
- Egg, beaten– 50 grams (One medium egg)
How to Make Sourdough Pumpkin Sandwich Bread
Step-by-Step Instructions
Feeding the Starter
- In the afternoon, take 25 grams of leftover sourdough starter out of the fridge. Feed the starter 50 grams of water and 50 grams of bread flour or all-purpose flour. Stir everything together thoroughly to combine.
- Cover the starter loosely with a lid and mark the top of the starter with a rubber band so you can see how much it rises. Let the starter rise for 6-8 hours or until the starter is roughly doubled-in-size. In the evening, your starter should be ready to use.
Note: Using a digital scale is essential for accurately weighing your ingredients. Here is the basic digital scale that I use from Amazon (affiliate link).
Mixing the Dough
- In a mixing bowl, add the water, salt, sugar, pumpkin puree, and 100 grams of sourdough starter. Stir them together with a spoon to thoroughly dissolve the liquid ingredients.
- Next, add the all-purpose flour and mix the dough to combine.
- Once the dough is rough and shaggy, start kneading it inside of the mixing bowl with your hand for 1-2 minutes, or until the dough finally holds together as one solid mass.
- Cover the dough with a kitchen towel and let it rest at room temperature for 30 minutes.
Stretch and Folds (and Adding the Butter)
- After the first 30 minute rest, it’s time to add the butter. Place 54 grams of softened butter on top of the dough. (54 grams is half of a standard stick of butter in the US). Dimple the butter into the dough with your finger tips and then squeeze the butter into the dough with your hands until the dough fully absorbs the butter.
- Give the dough its first set of stretch and folds. Grab an edge of the dough and stretch it up in the air and then fold it over the top of the dough. Grab the next edge of dough and give it another stretch and fold. Go around the dough and give 10-20 total stretch and folds. Then, cover up the dough with a kitchen towel and let it rest for another 30 minutes.
- After the 30 minute rest, give the dough a second set of stretch and folds. This time the dough should hold together better than the first time. Cover the dough up again and let it rest for 30 minutes.
- A half hour later, give the dough its third and final set of stretch and folds. Then, it’s time for the bulk fermentation or the first rise.
The First Rise (Bulk Fermentation)
- Flip the dough over so that it is seam-side-down and smooth-side-up inside of the mixing bowl. Then, cover the dough with plastic wrap or an airtight lid. Let the dough rise at room temperature overnight, or for 6-8 hours, until it is doubled in size.
- The next morning, the dough should have risen significantly and be completely doubled in size.
Pre-Shaping and Final Shape
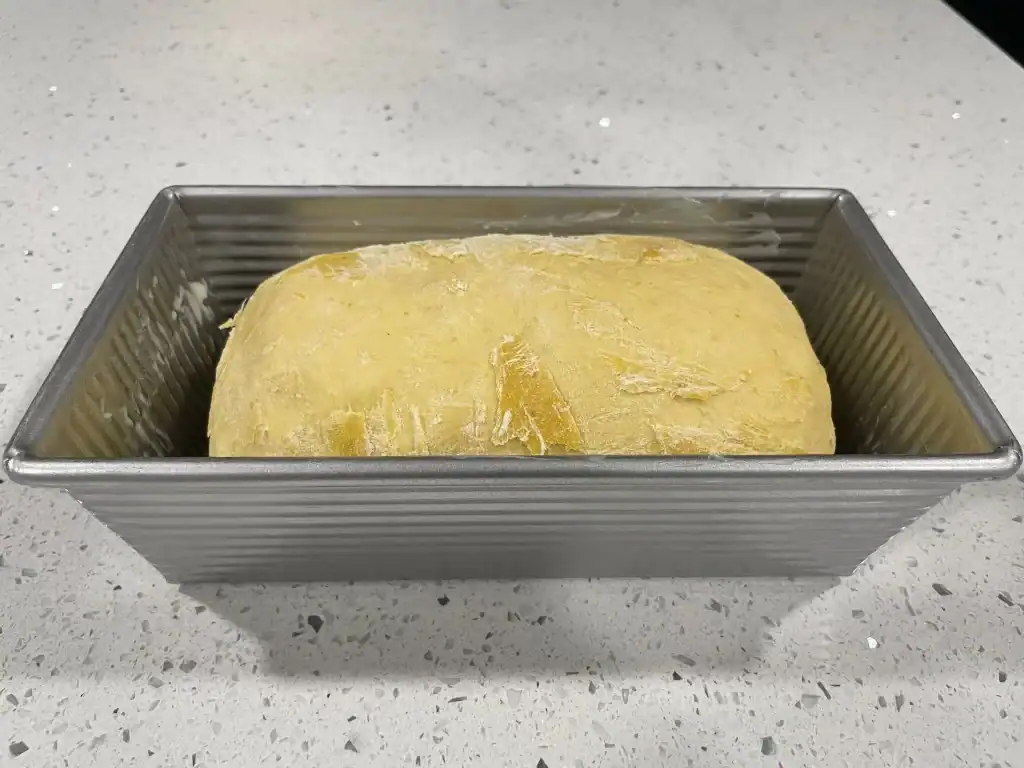
- Take the dough out of the mixing bowl and place it on an un-floured surface on your countertop. Cup and pull the dough with your hands to pre-shape it into a smooth, tight ball of dough. Cover the dough up with a kitchen towel and let it rest on the counter for 15 minutes.
- After the 15 minute rest, get out a standard-size “one pound” loaf pan and grease it with a small amount of oil or butter.
Note: This is my favorite non-stick, metal loaf pan from USA Pans (affiliate link). This pan does not require any oil or butter to be non-stick. The non-stick coating on the pan works very well and helps the bread release easily from the pan after baking.
- Now it’s time to give the sourdough pumpkin sandwich bread its final shape for the loaf pan. Sprinkle the top of the dough with a little bit of flour and spread the flour around to create a nonstick surface on top of the dough. Then, flip the dough over so the smooth side is against the counter and the sticky side is facing up.
- Gently pull out the edges of the dough to form a square shape that is roughly the size of your loaf pan. Fold the right third of the square of dough over the middle third. Then fold the left third of dough over the middle third so that the seam meets in the middle.
- Roll the dough over on itself from one end to the other so that you have a tight cylinder of dough. The dough should now be in a basic loaf shape that will fit nicely in your loaf pan.
- Transfer the the dough into the loaf pan with the seam side facing down and the smooth side facing up.
The Second Rise (Final Proof)
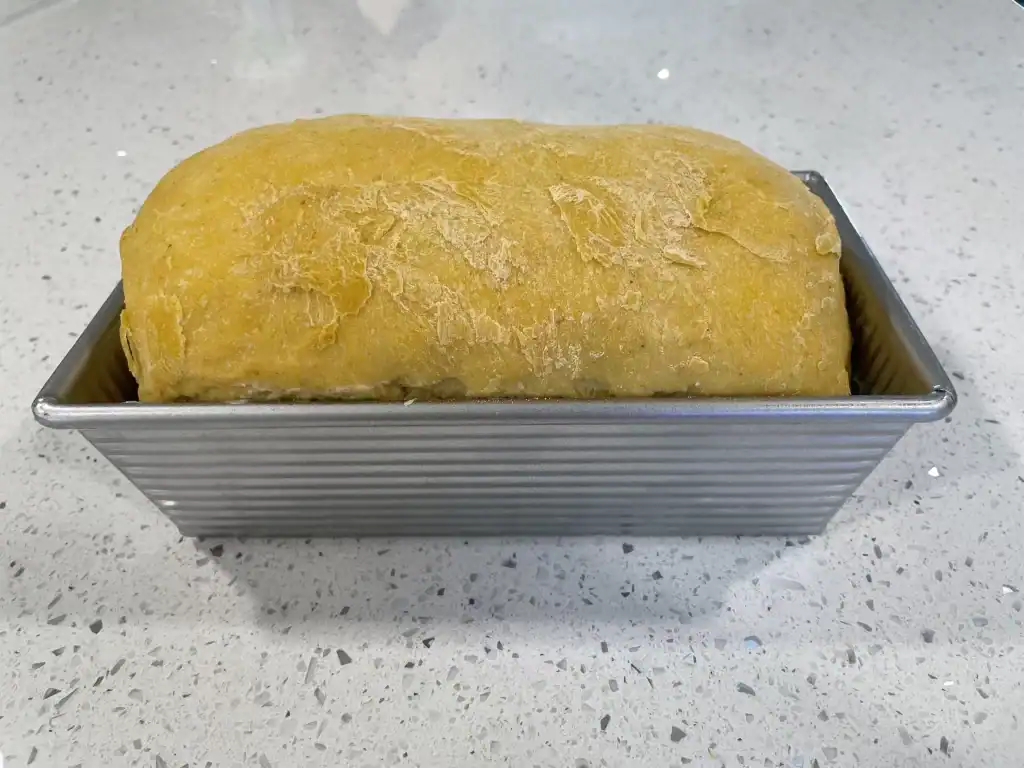
- Cover the dough with a kitchen towel and let the dough rise at room temperature for 3-6 hours, or until it is completely doubled in size.
Note: I find that it’s best to let sandwich breads like this proof for a long time so that they are significantly risen and very delicate to the touch. Doing this means that the bread won’t rise very much in the oven, since it is already almost fully risen, but the result is that the bread won’t tear on the sides during baking and the interior of the loaf will be lighter and fluffier.
- After 3-6 hours, your dough should be doubled in size and ready to bake.
Baking
- 30 minutes before you’re ready to bake, preheat your oven to 400°F (204°C). Position one oven rack in the middle of the oven and one rack near the bottom of the oven.
- Place a metal cake pan on the bottom rack of the oven to preheat. You will use this hot metal pan to add steam to the oven while the bread is baking.
- Once the dough has finished proofing and the oven has preheated for 30 minutes, brush the top of the dough with one beaten egg. It’s best to use a pastry brush to apply the egg wash. This optional step will give the baked bread a beautiful golden sheen on top, so I highly recommend it.
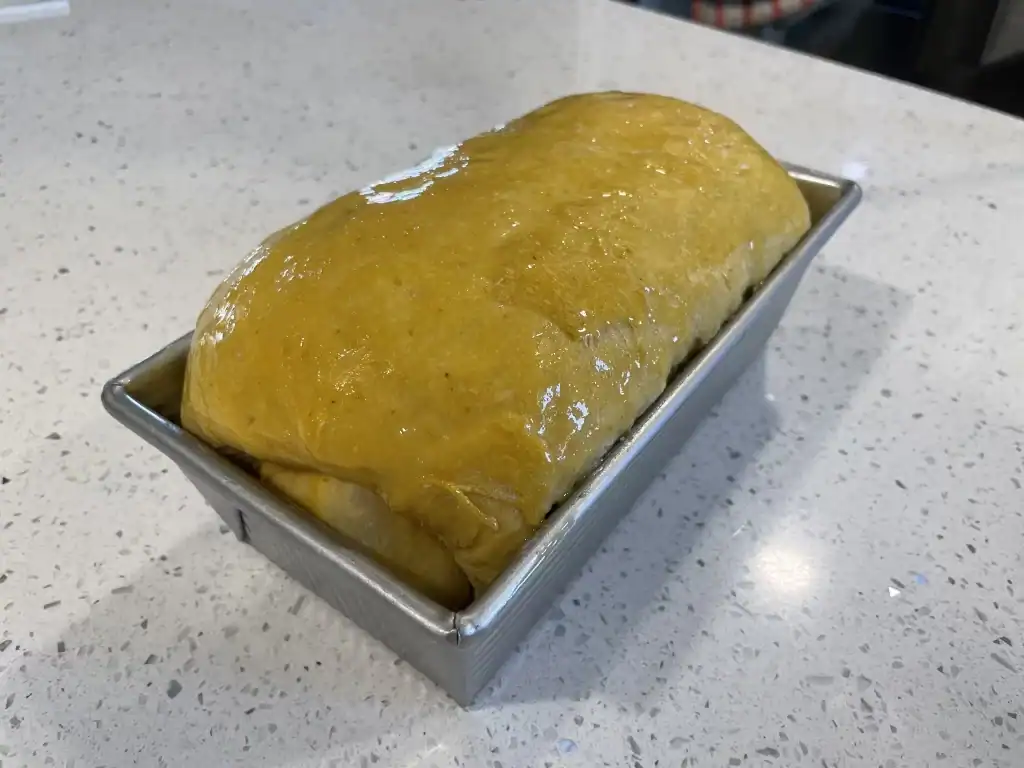
- Transfer the loaf pan into the oven onto the middle rack. Add one cup of hot or boiling water into the metal cake pan on the bottom rack of the oven. The hot water should immediately start adding steam to the oven. This will allow the bread to fully rise and to form a beautiful crust.
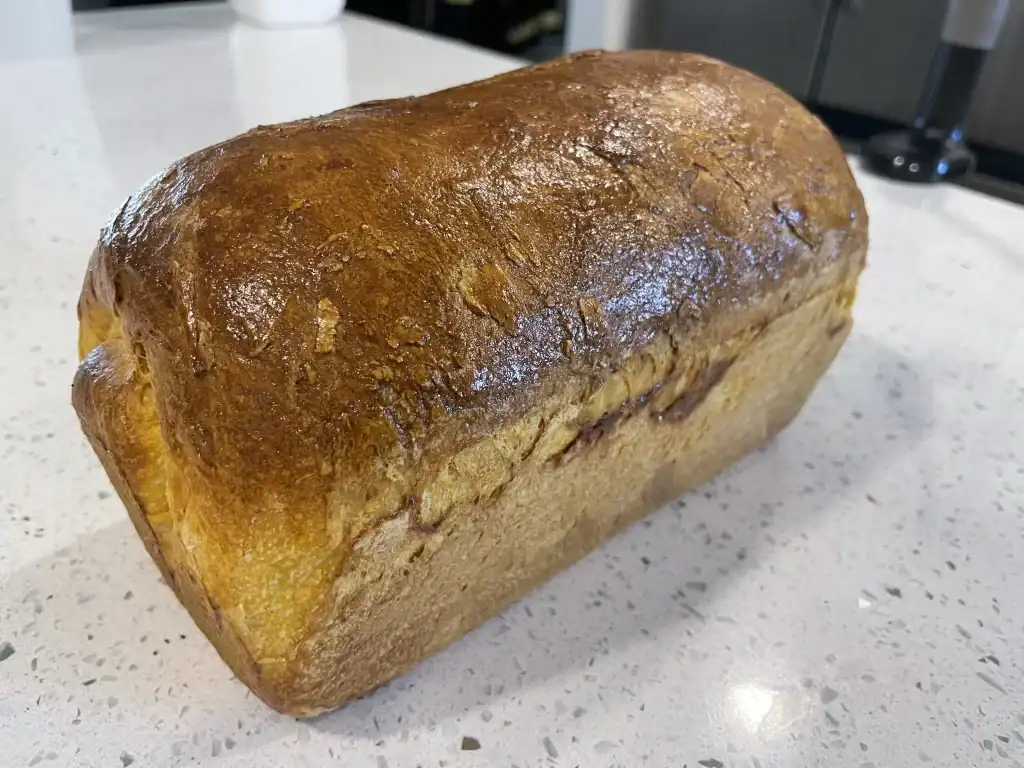
- Bake the bread for 20 minutes and then remove the metal pan with water; you won’t need it for the second half of the bake time. After removing the steam tray, continue baking for another 25-30 minutes. The final bake time should be 45-50 minutes in total.
- Transfer the finished loaf of sourdough pumpkin sandwich bread onto a cooling rack and allow it to cool for at least one hour before slicing.
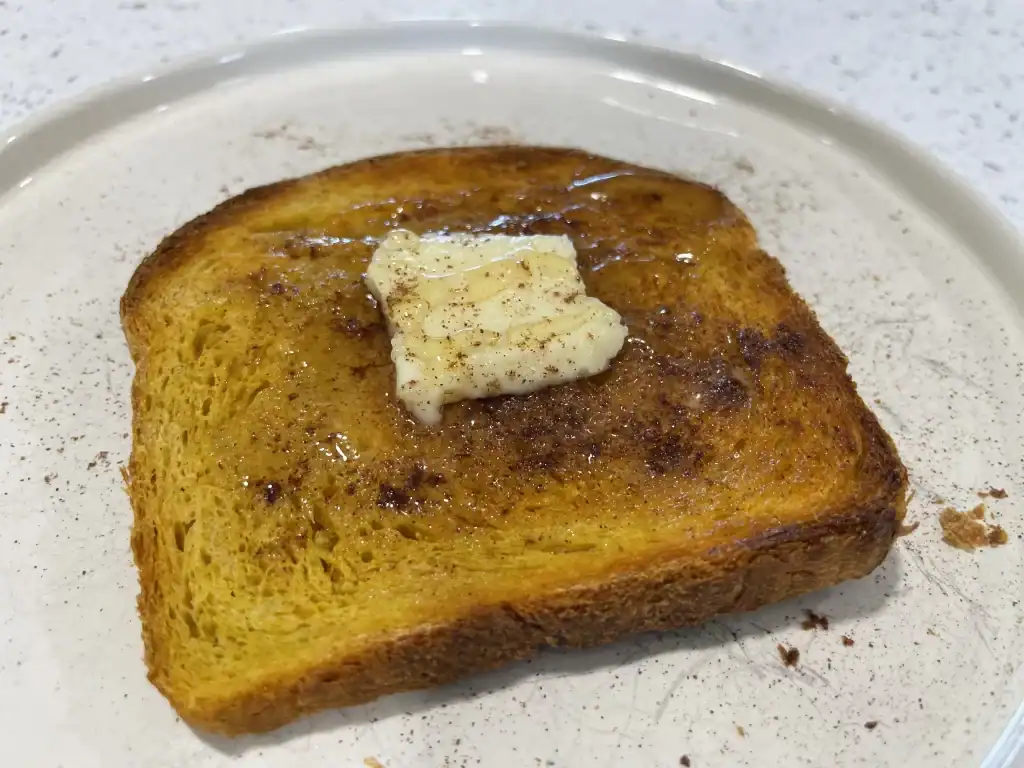
- Serve slices of this bread toasted with butter and honey. You can also add pumpkin pie spice for a delicious fall version of cinnamon toast. Enjoy!
Sourdough Pumpkin Sandwich Bread

This sourdough pumpkin sandwich bread is a soft and fluffy enriched bread (similar to brioche) that has a beautiful orange color and mild pumpkin flavor from the addition of pumpkin puree. This seasonal sandwich bread is also naturally leavened with sourdough starter instead of commercial baker’s yeast. It’s a perfect fall sourdough bread for home bakers.
Ingredients
Feeding The Sourdough Starter
- Sourdough Starter, leftover - 25 grams
- Bread Flour or All-Purpose Flour - 50 grams
- Water - 50 grams
Main Dough
- All-Purpose Flour - 450 grams
- Pumpkin Puree - 200 grams
- Whole Milk - 100 grams
- Water - 50 grams
- Sourdough Starter, active - 100 grams
- White Sugar - 25 grams
- Salt - 10 grams
- Butter - 54 grams
Egg Wash
- Egg - 50 grams (1 medium egg)
Instructions
Feeding the Sourdough Starter
- In the afternoon, take 25 grams of leftover sourdough starter out of the fridge. Feed the starter 50 grams of water and 50 grams of bread flour or all-purpose flour. Stir everything together thoroughly to combine.
- Cover the starter loosely with a lid and mark the top of the starter with a rubber band so you can see how much it rises. Let the starter rise for 6-8 hours or until the starter is roughly doubled-in-size. In the evening, your starter should be ready to use.
Mixing the Dough
- In a mixing bowl, add the water, salt, sugar, pumpkin puree, and 100 grams of sourdough starter. Stir them together with a spoon to thoroughly dissolve the liquid ingredients.
- Next, add the all-purpose flour and mix the dough to combine.
- Once the dough is rough and shaggy, start kneading it inside of the mixing bowl with your hand for 1-2 minutes, or until the dough finally holds together as one solid mass.
- Cover the dough with a kitchen towel and let it rest at room temperature for 30 minutes.
Stretch and Folds (and Adding the Butter)
- After the first 30 minute rest, it's time to add the butter. Place 54 grams of softened butter on top of the dough. (54 grams is half of a standard stick of butter in the US). Dimple the butter into the dough with your finger tips and then squeeze the butter into the dough with your hands until the dough fully absorbs the butter.
- Give the dough its first set of stretch and folds. Grab an edge of the dough and stretch it up in the air and then fold it over the top of the dough. Grab the next edge of dough and give it another stretch and fold. Go around the dough and give 10-20 total stretch and folds. Then, cover up the dough with a kitchen towel and let it rest for another 30 minutes.
- After the 30 minute rest, give the dough a second set of stretch and folds. This time the dough should hold together better than the first time. Cover the dough up again and let it rest for 30 minutes.
- A half hour later, give the dough its third and final set of stretch and folds. Then, it's time for the bulk fermentation or the first rise.
The First Rise (Bulk Fermentation)
- Flip the dough over so that it is seam-side-down and smooth-side-up inside of the mixing bowl. Then, cover the dough with plastic wrap or an airtight lid. Let the dough rise at room temperature overnight, or for 6-8 hours, until it is doubled in size.
- The next morning, the dough should have risen significantly and be completely doubled in size.
Pre-Shaping and Final Shape
- Take the dough out of the mixing bowl and place it on an un-floured surface on your countertop. Cup and pull the dough with your hands to pre-shape it into a smooth, tight ball of dough. Cover the dough up with a kitchen towel and let it rest on the counter for 15 minutes.
- After the 15 minute rest, get out a standard-size "one pound" loaf pan and grease it with a small amount of oil or butter.
- Now it's time to give the sourdough pumpkin sandwich bread its final shape for the loaf pan. Sprinkle the top of the dough with a little bit of flour and spread the flour around to create a nonstick surface on top of the dough. Then, flip the dough over so the smooth side is against the counter and the sticky side is facing up.
- Gently pull out the edges of the dough to form a square shape that is roughly the size of your loaf pan. Fold the right third of the square of dough over the middle third. Then fold the left third of dough over the middle third so that the seam meets in the middle.
- Roll the dough over on itself from one end to the other so that you have a tight cylinder of dough. The dough should now be in a basic loaf shape that will fit nicely in your loaf pan.
- Transfer the the dough into the loaf pan with the seam side facing down and the smooth side facing up.
The Second Rise (Final Proof)
- Cover the dough with a kitchen towel and let the dough rise at room temperature for 3-6 hours, or until it is completely doubled in size.
- After 3-6 hours, your dough should be doubled in size and ready to bake.
Baking
- 30 minutes before you're ready to bake, preheat your oven to 400°F (204°C). Position one oven rack in the middle of the oven and one rack near the bottom of the oven.
- Place a metal cake pan on the bottom rack of the oven to preheat. You will use this hot metal pan to add steam to the oven while the bread is baking.
- Once the dough has finished proofing and the oven has preheated for 30 minutes, brush the top of the dough with one beaten egg. It's best to use a pastry brush to apply the egg wash. This optional step will give the baked bread a beautiful golden sheen on top, so I highly recommend it.
- Transfer the loaf pan into the oven onto the middle rack. Add one cup of hot or boiling water into the metal cake pan on the bottom rack of the oven. The hot water should immediately start adding steam to the oven. This will allow the bread to fully rise and to form a beautiful crust.
- Bake the bread for 20 minutes and then remove the metal pan with water; you won't need it for the second half of the bake time. After removing the steam tray, continue baking for another 25-30 minutes. The final bake time should be 45-50 minutes in total.
- Transfer the finished loaf of sourdough pumpkin sandwich bread onto a cooling rack and allow it to cool for at least one hour before slicing.
- Serve slices of this bread toasted with butter and honey. You can also add pumpkin pie spice for a delicious fall version of cinnamon toast. Enjoy!
Notes
- I find that it's best to let sandwich breads like this proof for a long time so that they are significantly risen and very delicate to the touch. Doing this means that the bread won't rise very much in the oven, since it is already almost fully risen, but the result is that the bread won't tear on the sides during baking and the interior of the loaf will be lighter and fluffier.