This is a foolproof, straight-forward sourdough sandwich bread recipe. You’ll get a soft and fluffy sandwich bread that’s a little bit sweet with a slightly complex flavor from the sourdough starter. It’s next level white bread – perfect for making toast or peanut butter & jelly sandwiches.

Why This Recipe Works
Some people think you need to use a packet of instant yeast in order to get a soft and fluffy sandwich bread. Wrong! You can make a wonderfully light and fluffy loaf of soft sourdough sandwich bread with nothing but basic pantry ingredients and your sourdough starter – no yeast required.
If you’ve been making rustic and crusty sourdough loaves, but you’re looking for something softer that will remind you of sliced white bread from the supermarket, this is the recipe for you – except that this bread will be far superior to anything you could get at the grocery store!
This is a super straight-forward recipe to make. You’ll mix all of the dough ingredients together in one mixing bowl, it doesn’t require an autolyse or any complicated steps, and you can knead by hand or use a stand mixer. Anything to make your life easier.
Are you ready to make the best sandwich bread of your life? Here’s the recipe.
Video Tutorial: Soft Sourdough Sandwich Bread
Soft Sourdough Sandwich Bread
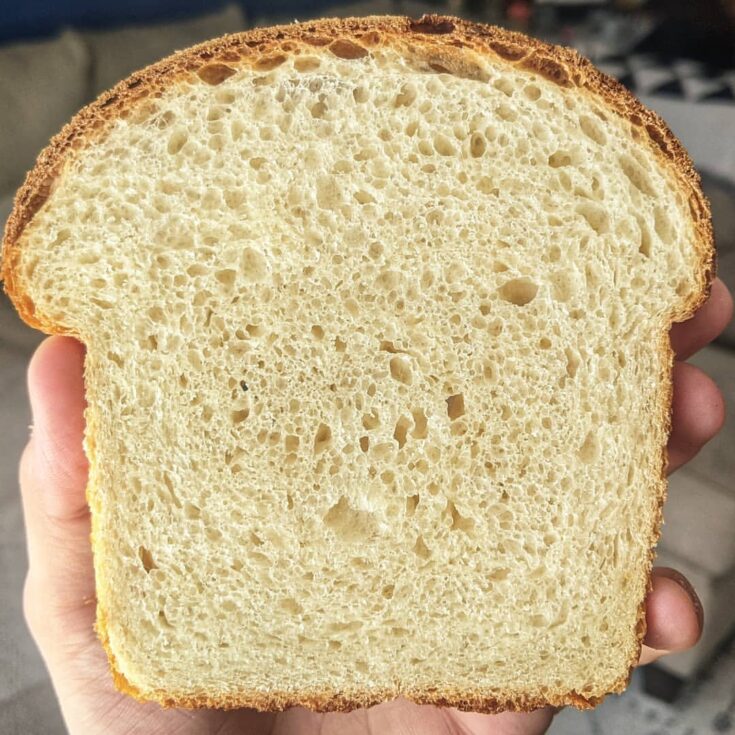
This is a foolproof, straight-forward sourdough sandwich bread recipe. You'll get a soft and fluffy sandwich bread that's a little bit sweet with a slightly complex flavor from the sourdough starter. It's next level white bread - perfect for making toast or peanut butter & jelly sandwiches.
Ingredients
- Bread Flour 450g
- Water 150g
- Milk 100g
- Sugar 25g
- Salt 10g
- Butter 50g
- Sourdough Starter 100g
Instructions
Feeding the starter
- Mix 25 grams of leftover sourdough starter with 50 grams of bread flour and 50 grams of water. Let the sourdough starter rise for 4-8 hours at room temperature. Use it when it has roughly doubled in size.
Mixing the dough
- Mix the water, milk, sugar, salt, and sourdough starter together in the bowl. Stir until all of the solid ingredients are dissolved into the liquid.
- Then, add the bread flour and softened butter to the mix. Stir the ingredients together until the dough comes together.
Kneading
- Once a rough dough has been formed, knead it by hand for 8-10 minutes on your kitchen counter until the dough develops a smooth surface. You can also knead for 8-10 minutes in a stand mixer with a dough hook attachment.
Bulk Fermentation (The First Rise)
- With your hands, form the kneaded dough into a smooth ball. Transfer it into an oiled glass container, making sure to get some oil on both sides of the dough.
- Cover up the dough and let it rise at room temperature for about 6-8 hours, or until it roughly doubles in size. (If you want to build some extra strength in the dough, you can remove the dough and give it one set of stretch and folds at the 3 hour mark, but this step is optional.)
The Preshape
- Once the dough has gone through its first rise, it should feel slightly puffy, light to the touch, and it should have doubled in size.
- Take the dough out of the bowl and transfer it to a lightly floured countertop with the smooth side of the dough on the counter and the seam side facing up.
- Shape the dough into a ball using the stretch and fold technique. Then cover it up with a kitchen towel and let the dough rest for 30 minutes.
The Final Shape
- After the 30 minute rest, take out a bread pan and grease it with butter or oil. If you’re using a non-stick bread pan, you won’t need to grease it. Now, uncover the dough and form it into a sandwich loaf shape.
- On a lightly floured counter, flatten the dough into a square with the seam side (the sticky side) facing up. Fold the right third of the square over the middle third, then fold the left third of the dough over the middle third.
- Now, starting with the farthest side from you, roll the dough back toward you, tucking and rolling until you have a tight cylinder of dough. Place the loaf seam side down into the bread pan.
Proofing
- Cover the dough with a kitchen towel and let it rise at room temperature for 4-6 hours, or until it’s almost completely doubled in size. I really like to push the proofing time on sandwich loaves.
Note: Since I don’t usually score pan/tin loaves, if I don’t let the dough proof long enough, the loaves tend to bust open one of the sides where the dough breaks away from the pan. So, that’s why I like to let the dough keep proofing until it almost reaches its limit before I finally bake it.
Baking
- Thirty minutes before your dough is ready to bake, preheat your oven to 400°F with a metal cake pan on the bottom rack. You will use this as a steam tray later.
- Brush the top of the loaf with a beaten egg. This step is optional, but recommended. The egg wash will give the baked loaf of bread a golden brown sheen when it comes out of the oven.
- Slide the bread pan into the middle rack of the oven and let it bake for 40-50 minutes. Before you close the oven door, pour about a cup of boiling water into the steam tray. This will release steam as your bread bakes, giving it a bakery-quality crust.
- After 20 minutes of baking, remove the steam tray from your oven and continue baking.
- Once you’ve been baking for 40-50 minutes, take the loaf out of the oven and test it with a probe thermometer. When the internal temperature reads at least 195°F, it’s done baking.
Cooling
- Take the bread out of the pan and let it rest on a wire rack for about an hour before slicing in. Enjoy this bread as toast, or for making an amazing PB&J!
Notes
- Since I don’t usually score pan/tin loaves, if I don’t let the dough proof long enough, the loaves tend to bust open one of the sides where the dough breaks away from the pan. So, that’s why I like to let the dough keep proofing until it almost reaches its limit before I finally bake it.
This bread recipe appears in my ebook, No-Nonsense Sourdough. If you like straight-forward sourdough bread recipes without any unnecessary steps or complicated terminology, check out this recipe ebook. It’s packed with 18 creative recipes for sourdough breads, rolls, and pizzas that you’ll absolutely love. Click here to discover some more recipes that are in the ebook. The sourdough cinnamon rolls are my favorite!