I used to avoid making high hydration sourdough bread recipes because of the complicated steps involved. Autolyse, squeezing in the salt, reserving some of the water for later…who has the time?
The good news is that you don’t need to avoid this recipe! I left all of those steps completely out.
If you’re looking for an easy high hydration sourdough bread recipe without any unnecessary steps, you’ve found it! This recipe doesn’t require an autolyse, bassinage, or any other complicated steps. You can make a great loaf of open-crumb sourdough bread while keeping the process super simple.
What Is High Hydration Sourdough Bread?
As a general rule, “high hydration sourdough bread” refers to breads where the dough has a relatively high ratio of water to flour by weight. Anything above 80% hydration is usually considered high hydration.
For this recipe, I kept the hydration level exactly at 80 percent. So, for every 100 grams of flour in the dough, there are 80 grams of water. This makes for a relatively high hydration dough, but one that is still very manageable and able to be made without any complicated steps.
Beginner’s Sourdough Bread Recipe: If you want to try out a lower-hydration sourdough bread recipe that’s even more perfect for beginners, check out my Good Sourdough Bread recipe right here.
Two Benefits of High Hydration Breads
Bread doughs can be made with less water (lower hydration) or more water (higher hydration), and each style of dough has its advantages. Some people believe high hydration doughs are inherently superior, even going as far as to say “the wetter the better” when it comes to bread dough. While this is definitely not true in all cases (bagels require a stiff dough, for example), let’s consider the benefits of high hydration doughs.
1. Longer Shelf-Life
High hydration doughs usually produce breads with longer shelf-life. It makes sense to me. If the final bread has a higher water content, it won’t dry out as fast and will last longer on the shelf.
2. More Open Crumb Structure
High hydration doughs also tend to produce breads with a more open crumb structure. Of course, a lot of the crumb structure depends on how the bread is shaped by hand, but if you’re a fan of sourdough bread with large, irregular holes scattered throughout the crumb, high hydration bread is something you should try.
Why This Recipe & Method Works Without Any Complicated Steps
Whenever I can, I love to make bread without any complicated steps. Mixing all of the ingredients together in the mixing bowl at the same time is FAR easier to me than mixing flour and water together first, and mixing the salt/starter in later.
If you’re a fan of the autolyse step, there’s nothing wrong with that. But you absolutely do not have to autolyse in order to make higher hydration sourdough bread. This recipe turns out great by directly mixing all of the ingredients together at the same time. Why not make life a little easier?
The most important step to keep in mind for this recipe is the “stretch and folds.”
While the dough is going through the first rise, you’re going to give the dough three sets of stretch and folds in the mixing bowl. This will allow the gluten to develop in a gentle way that maintains the airy quality of the bread dough.
This is a fairly easy and effective step that replaces traditional kneading (better for lower hydration doughs) or more complicated steps that are often used for wetter doughs.
Now, let’s get into the recipe!
Specifics of this High Hydration Sourdough Bread Recipe
Yield and Dough Weight
This recipe makes one loaf of sourdough bread with a dough weight of 910 grams (~32 ounces). To make two loaves of this high hydration sourdough bread, you can easily double the ingredient amounts and divide the dough into two equal pieces before the shaping step.
Recipe Overview in Baker’s Percentages
Once the dough is made, with flour, water, salt, and sourdough starter mixed together, here is the breakdown of each ingredient in grams and baker’s percentages.
| Ingredient | Weight | Bakers Percentage |
|---|---|---|
| Bread Flour | 450 grams | 90% |
| Whole Wheat Flour | 50 grams | 10% |
| Water | 400 grams | 80% |
| Salt | 10 grams | 2% |
Keep in mind that this recipe calls for 100 grams of sourdough starter at 100% hydration. Therefore, 50 grams of the water and 50 grams of the bread flour listed above will come from the sourdough starter.
Some of My Favorite Baking Tools (Affiliate Links):
Baker of Seville Bread Lame
Oval Banneton Basket
Non-Stick Bread Pan
Non-Stick Focaccia Pan
Ingredients – Easy High Hydration Sourdough Bread
| Ingredient | Weight |
|---|---|
| Bread Flour | 400 grams |
| Whole Wheat Flour | 50 grams |
| Water | 350 grams |
| Sourdough Starter (Active) | 100 grams |
| Salt | 10 grams |
Types of Flour to Use
This recipe uses both a white bread flour, and a whole grain wheat flour. I kept the flour choices simple with ingredients that you are very likely to find at any supermarket.
The bread flour I used is King Arthur Bread Flour, which has a 12.7% protein content.
The whole wheat (wholemeal) flour that I used is King Arthur Whole Wheat Flour, which has a 14% protein content.
Different types of flour absorb different amounts of water, so an 80% hydration dough with one brand/type of flour might actually feel drier than one made from a different flour. 80% hydration won’t always look and feel the same.
So, to get the most similar results to what I got with this recipe, try to choose these same exact flours, or ones that are similar in protein content.
How to Make Easy High Hydration Sourdough Bread
Step-by-Step Instructions
Feeding Your Starter
| Ingredient | Weight |
|---|---|
| Sourdough Starter (Leftover from the fridge) | 25 grams |
| Bread Flour | 50 grams |
| Water | 50 grams |
To feed your sourdough starter for this recipe, take 25 grams of leftover sourdough starter out of the fridge. Add 50 grams of water and 50 grams of bread flour to the leftover starter. Mix everything together until thoroughly combined. Mark the top of the starter with a rubber band around the jar, cover it up, and let the starter sit out at room temperature for 6-8 hours, or until it doubles in size.
I usually feed my starter the night before I plan to make the bread dough. For example, at 10 pm I feed my starter, and then at 6 am the next morning the starter is doubled in size and ready to use.
Mixing the Dough
The next morning, place a medium to large mixing bowl on a digital scale. Weight out 350 grams of water into the mixing bowl along with 10 grams of salt and 100 grams of the active sourdough starter. Mix together thoroughly until the starter and salt dissolve into the water.
Next, add 50 grams of whole wheat flour and 400 grams of bread flour. Mix them into the rest of the ingredients until the flour is hydrated and there aren’t any clumps of dry flour left. Then cover up the dough with a kitchen towel and let it rest on the counter for 30 minutes.
Once you’ve mixed the dough, it will start to rise slowly. This is called the “bulk fermentation” stage, or the first rise. During this stage, you’re going to give the dough three sets of stretch and folds with 30 minutes of rest in between each one.
Bulk Fermentation (The First Rise)
After the first 30 minute rest, give the dough its first set of “stretch and folds.” Pick up an edge of the dough in the bowl and stretch it up into the air. When you feel the dough start to tense up, fold the edge of the dough over the center. Go around the bowl 10-16 times, stretching and folding the dough over itself. After sixteen folds, you should feel the dough start to tighten up. This is the gluten network becoming stronger. Cover up the dough, and let it rest for another 30 minutes.
Thirty minutes later, give your dough another set of stretch and folds. This time, stop after just 8-10 folds. Cover up the dough and let it rest for another 30 minutes.
Finally, give your dough one last set of stretch and folds. Fold the edges of the dough over the center 6-8 times, until you feel the dough tighten up again. (You can do this last set of stretch and folds in a greased glass container, like I show in the video.)
Then, flip the dough over so the smooth side is facing up, and cover up the dough. Let it continue to rise at room temperature until it has almost doubled in size. This could take another 3-6 hours, depending on the temperature of your kitchen.
The Preshape
When your dough has almost doubled in size, flip it out onto the kitchen counter with the seam-side facing down. Using your hands or a bench scraper, gently shape the mass of dough into a tight ball. This preshape step will create surface tension across the top of the dough and make it easier to shape the dough into an oval shape later. Let the dough rest for 30 minutes on the counter, uncovered.
The Final Shape
Now, lightly dust an oval-shaped banneton basket with rice flour or whole wheat flour. This will prevent the dough from sticking to the basket while it proofs.
Dust the top of the ball of dough with bread flour and flip it over so that the smooth-side is facing down and the sticky-side is facing up. Then, gently pull out the dough into a square shape with your finger tips.
Fold the right third of the dough over the middle third, then fold the left third of the dough over the middle third as well. Press down to seal the seam where the two sides meet in the middle. Then roll the dough into a tight cylinder, starting from the far side and rolling toward yourself. Once you have a cylinder, fold the flaps of dough on each end underneath the rest of the dough. This will smooth out the ends of the dough, making for a more attractive final loaf of bread.
Finally, flip the dough upside down into your prepared banneton basket. The seam-side should be facing up.
Proofing
Move the banneton basket to your refrigerator to let it cold-proof in the fridge overnight. I usually leave my dough proofing in the fridge until I’m ready to bake it the next day. 8-24 hours is a good amount of cold-proofing time for this recipe.
Recommended Video: Why I Don’t Cover Up My Sourdough Bread in the Fridge
The next day, 30 minutes before you want to bake your bread, preheat your oven to 500°F with a Dutch oven or Challenger Bread Pan inside. When the oven has preheated, take the dough out of the fridge. You can score and bake the loaf cold from the fridge; there is no need to let it come up to room temperature.
Scoring
Flip the dough out of the banneton basket onto a piece of parchment paper that is a little bit larger than the size of the dough. Dust off any excess flour from the top of the dough.
Hold a razor blade, or a bread lame, at a shallow angle and score the dough in one long slash from the far end of the dough to the near end. This will allow the dough to burst open beautifully along this score mark when it rises in the oven. If you don’t score it now, the bread might burst open in strange places when it’s baking.
To get the same bread lame that I used for this recipe, the UFO lame, use my affiliate link right here. By using my affiliate link you’ll also get a 10% discount!
Baking
Holding both ends of the parchment paper, carefully transfer the dough into your hot Dutch oven and close the lid. Bake for 20 minutes at 500°F with the lid closed. 20 minutes later, remove the lid and continue baking at 500°F for 12-15 minutes, until the top of the loaf has a golden brown color. Move the bread to a wire rack to cool for at least one hour before slicing in.
Taste and Texture
This bread has a lightly tangy flavor that is almost imperceptible. Most people wouldn’t know that it’s sourdough bread if they are expecting a strictly sour flavor. The flavor is softly tangy and mildly sweet – perfect for buttered toast or a hearty sandwich.
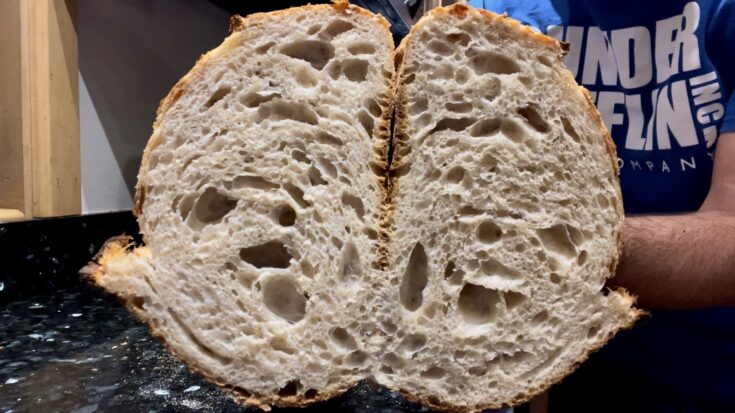
The interior of the loaf is scattered with irregular holes, which is what people are usually hoping for with a high hydration loaf of bread. But the holes aren’t too large or irregular that they’ll be annoying.
If you’re looking for an easy high hydration sourdough bread recipe that doesn’t require any complicated steps, I highly recommend you give this recipe and method a try!
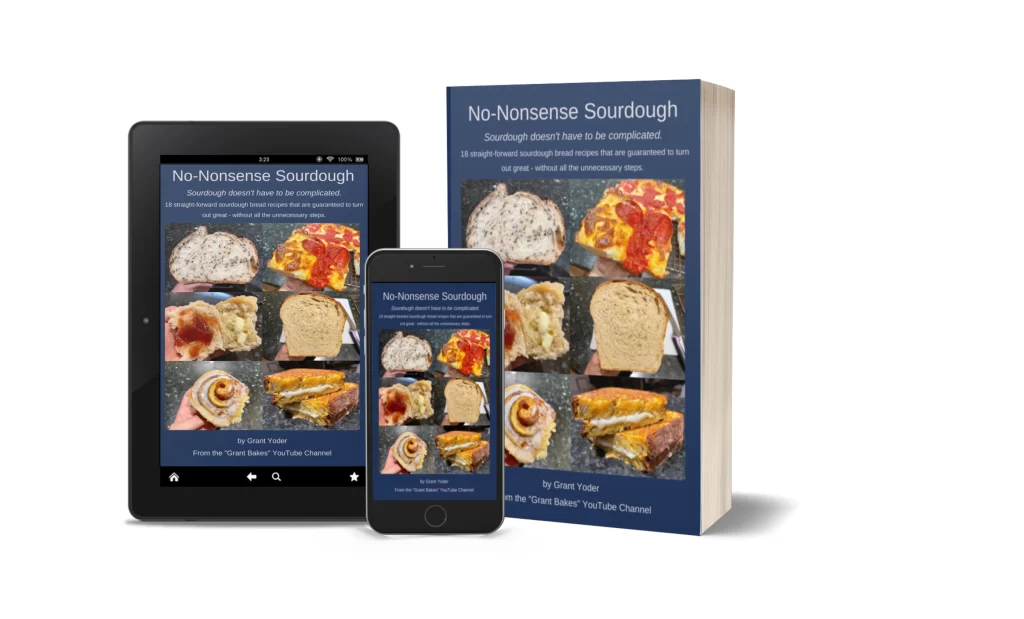
For more recipes like this one, check out my ebook, No-Nonsense Sourdough. I have 18 creative sourdough bread recipes that I can’t wait to share with you – Sourdough focaccia, cinnamon rolls, dinner rolls, sandwich bread, and so many more amazing recipes. Find out all about the ebook here!
Easy High Hydration Sourdough Bread
This relatively high hydration sourdough bread doesn't require any autolyse or unnecessary steps. The dough is 80% hydration in baker's percentages, but it's very manageable for new bakers.
Ingredients
- Bread Flour - 400 grams
- Whole Wheat Flour - 50 grams
- Water - 350 grams
- Sourdough Starter - 100 grams
- Salt - 10 grams
Instructions
Feeding your starter
- Take 25 grams of leftover sourdough starter out of the fridge. Add 50 grams of water and 50 grams of bread flour to the leftover starter. Mix everything together until thoroughly combined. Mark the top of the starter with a rubber band around the jar, cover it up, and let the starter sit out at room temperature for 6-8 hours, or until it doubles in size.
Note: I usually feed my starter the night before I plan to make the bread dough. For example, at 10 pm I feed my starter, and then at 6 am the next morning the starter is doubled in size and ready to use.
Mixing the dough
- The next morning, place a medium to large mixing bowl on a digital scale. Weight out 350 grams of water into the mixing bowl along with 10 grams of salt and 100 grams of the active sourdough starter. Mix together thoroughly until the starter and salt dissolve into the water.
- Next, add 50 grams of whole wheat flour and 400 grams of bread flour. Mix them into the rest of the ingredients until the flour is hydrated and there aren’t any clumps of dry flour left. Then cover up the dough with a kitchen towel and let it rest on the counter for 30 minutes.
- Once you’ve mixed the dough, it will start to rise slowly. This is called the “bulk fermentation” stage, or the first rise. During this stage, you’re going to give the dough three sets of stretch and folds with 30 minutes of rest in between each one.
Mixing the dough
- After the first 30 minute rest, give the dough its first set of “stretch and folds.” Pick up an edge of the dough in the bowl and stretch it up into the air. When you feel the dough start to tense up, fold the edge of the dough over the center. Go around the bowl 10-16 times, stretching and folding the dough over itself. After sixteen folds, you should feel the dough start to tighten up. This is the gluten network becoming stronger. Cover up the dough, and let it rest for another 30 minutes.
- Thirty minutes later, give your dough another set of stretch and folds. This time, stop after just 8-10 folds. Cover up the dough and let it rest for another 30 minutes.
- Finally, give your dough one last set of stretch and folds. Fold the edges of the dough over the center 6-8 times, until you feel the dough tighten up again. (You can do this last set of stretch and folds in a greased glass container, like I show in the video.)
- Then, flip the dough over so the smooth side is facing up, and cover up the dough. Let it continue to rise at room temperature until it has almost doubled in size. This could take another 3-6 hours, depending on the temperature of your kitchen.
The Preshape
- When your dough has almost doubled in size, flip it out onto the kitchen counter with the seam-side facing down. Using your hands or a bench scraper, gently shape the mass of dough into a tight ball. This preshape step will create surface tension across the top of the dough and make it easier to shape the dough into an oval shape later. Let the dough rest for 30 minutes on the counter, uncovered.
The Final Shape
- Now, lightly dust an oval-shaped banneton basket with rice flour or whole wheat flour. This will prevent the dough from sticking to the basket while it proofs.
- Dust the top of the ball of dough with bread flour and flip it over so that the smooth-side is facing down and the sticky-side is facing up. Then, gently pull out the dough into a square shape with your finger tips.
- Fold the right third of the dough over the middle third, then fold the left third of the dough over the middle third as well. Press down to seal the seam where the two sides meet in the middle. Then roll the dough into a tight cylinder, starting from the far side and rolling toward yourself. Once you have a cylinder, fold the flaps of dough on each end underneath the rest of the dough. This will smooth out the ends of the dough, making for a more attractive final loaf of bread.
- Finally, flip the dough upside down into your prepared banneton basket. The seam-side should be facing up.
Proofing
- Move the banneton basket to your refrigerator to let it cold-proof in the fridge overnight. I usually leave my dough proofing in the fridge until I’m ready to bake it the next day. 8-24 hours is a good amount of cold-proofing time for this recipe.
- The next day, 30 minutes before you want to bake your bread, preheat your oven to 500°F with a Dutch oven or Challenger Bread Pan inside. When the oven has preheated, take the dough out of the fridge. You can score and bake the loaf cold from the fridge; there is no need to let it come up to room temperature.
Scoring
- Flip the dough out of the banneton basket onto a piece of parchment paper that is a little bit larger than the size of the dough. Dust off any excess flour from the top of the dough.
- Hold a razor blade, or a bread lame, at a shallow angle and score the dough in one long slash from the far end of the dough to the near end. This will allow the dough to burst open beautifully along this score mark when it rises in the oven. If you don’t score it now, the bread might burst open in strange places when it’s baking.
Baking
- Holding both ends of the parchment paper, carefully transfer the dough into your hot Dutch oven and close the lid. Bake for 20 minutes at 500°F with the lid closed. 20 minutes later, remove the lid and continue baking at 500°F for 12-15 minutes, until the top of the loaf has a golden brown color. Move the bread to a wire rack to cool for at least one hour before slicing.
Notes
- I usually feed my starter the night before I plan to make the bread dough. For example, at 10 pm I feed my starter, and then at 6 am the next morning the starter is doubled in size and ready to use.
- This bread has a lightly tangy flavor that is almost imperceptible. Most people wouldn’t know that it’s sourdough bread if they are expecting a strictly sour flavor. The flavor is softly tangy and mildly sweet – perfect for buttered toast or a hearty sandwich.
- The interior of the loaf is scattered with irregular holes, which is what people are usually hoping for with a high hydration loaf of bread. But the holes aren’t too large or irregular that they’ll be annoying.
Recommended Products
As an Amazon Associate and member of other affiliate programs, I earn from qualifying purchases.