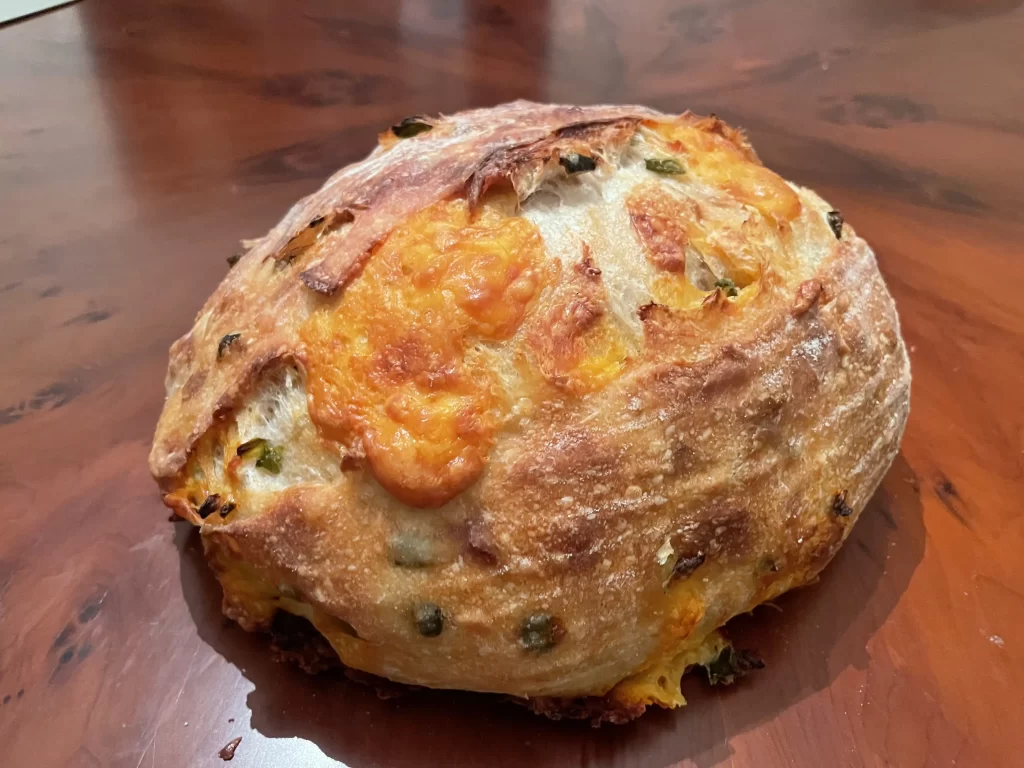
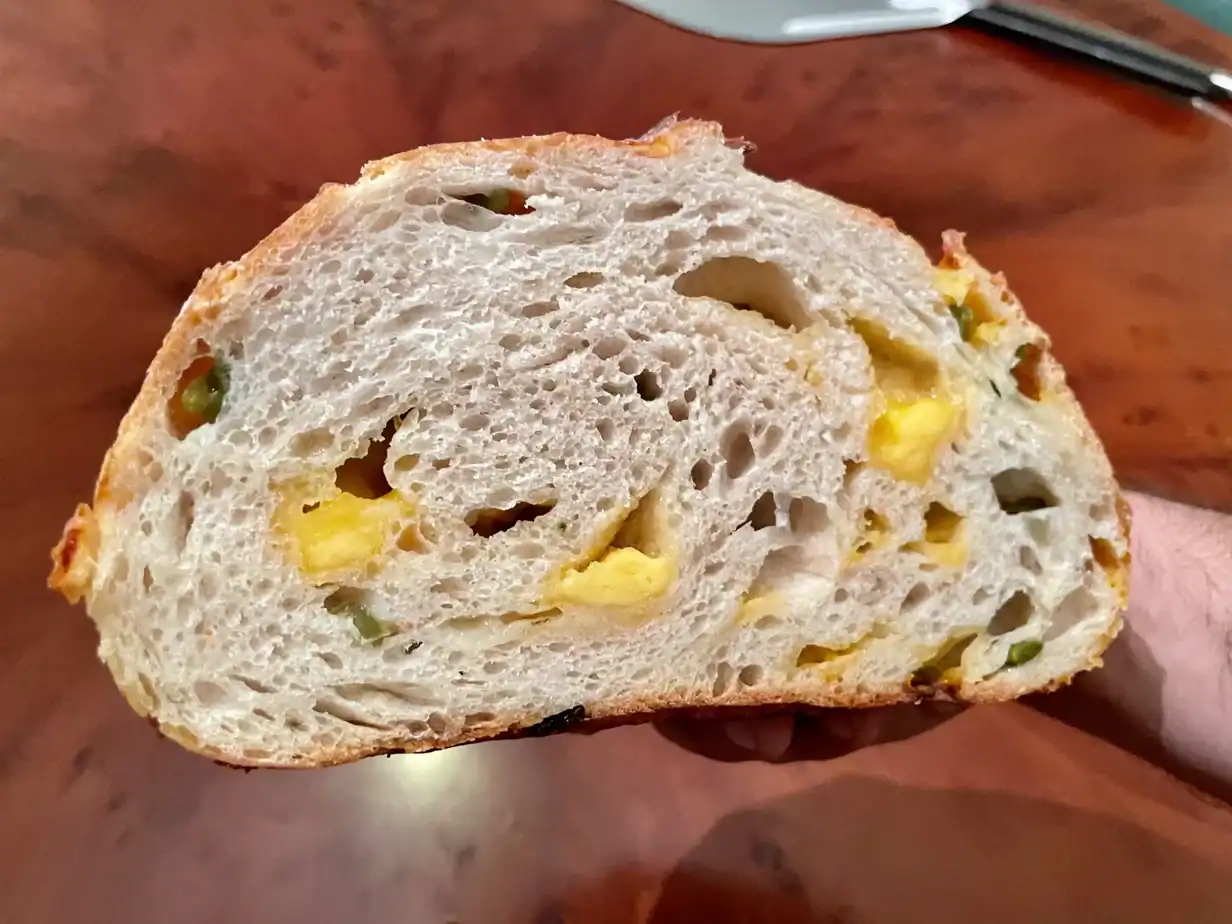
This recipe uses the perfect mix of cubed and diced cheddar cheese to achieve a melty and flavorful loaf of jalapeño-cheddar sourdough bread. The addition of a fresh, diced jalapeño pepper in the dough gives the loaf a spicy flavor that is perfectly balanced by pockets of creamy cheddar cheese dotted throughout the loaf.
Why This Recipe Works
Adding cheese to bread dough is an art form. If you shred the cheese to finely, it will disappear into the dough like butter, giving the bread a cheesy flavor but without any noticeable chunks of cheese. But, if you only add large cubes of cheese, there will be large pockets of cheese throughout the dough that tend to be hit-or-miss (some slices will have cheese and some won’t).
To avoid this problem, this recipe uses both cubed cheddar, and finely-diced cheddar cheese to ensure that the cheesy flavor is distributed evenly throughout the entire loaf. The addition of finely diced, fresh jalapeño also guarantees that a hint of spicy flavor is spread evenly throughout the bread, without finding large chunks of chili peppers in some slices, while others have none.
Ingredients You’ll Need
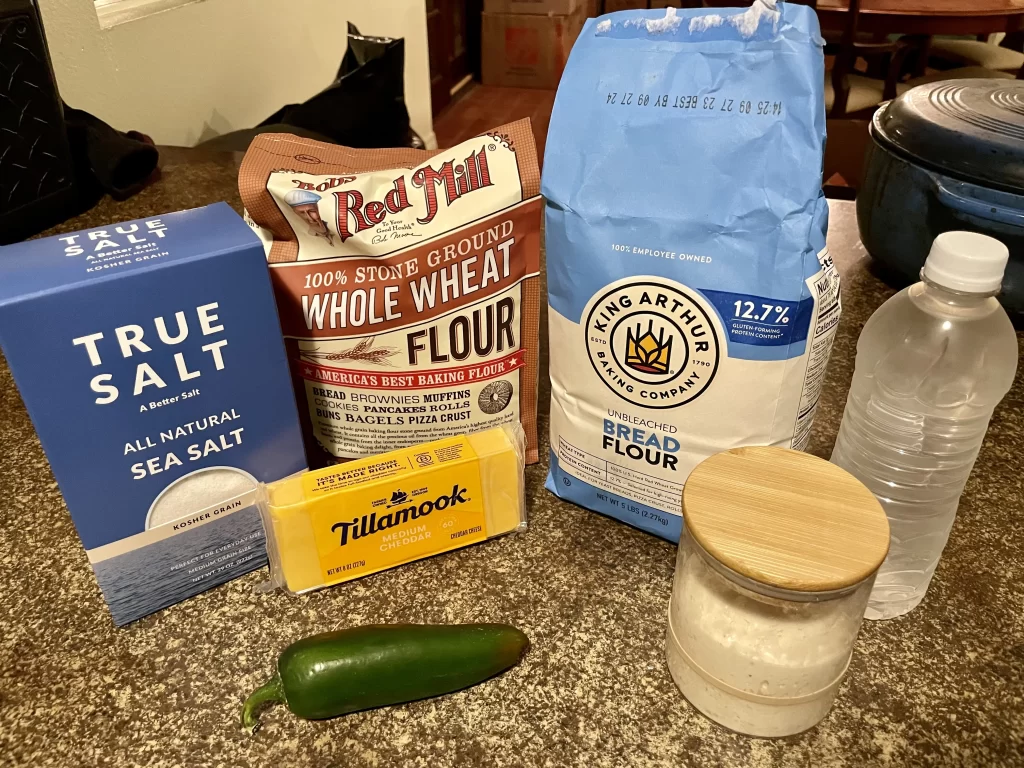
- Bread Flour: Any type of white bread flour should work if it has around 13% protein content. For this recipe, I used King Arthur brand in the blue bag, but anything labeled “bread flour” or “strong flour” should work fine.
- Whole Wheat Flour: Whole grain wheat flour adds an element of “nuttiness” to the bread and pairs nicely with the bold flavors of jalapeño and cheddar. You can use any brand of whole wheat flour or freshly milled flour. I used King Arthur brand whole wheat flour for this recipe.
- Water: Ideally, use unchlorinater tap water or bottled spring water.
- Sourdough Starter: I use a 100% hydration sourdough starter fed with bread flour. You could use a similar starter fed with whole wheat flour as well.
- Salt: Kosher salt, sea salt, or plain table salt work well. Avoid using iodized table salt.
- Cheddar Cheese: For one loaf of jalapeño-cheddar sourdough bread, this recipe calls for 8 ounces of mild or medium cheddar cheese. You can use yellow or white cheddar cheese, but yellow cheese will be more visually noticeable in the final loaf.
- Fresh Jalapeño Pepper: I opt to use fresh, diced jalapeño pepper for this recipe. This brings a warm spiciness to the dough without the vinegary tang that can taste out of place in some jars of pickled jalapeños.
Note: Check recipe card below for full ingredient amounts and quantities.
Substitutions and Additions
- Omitting the Whole Wheat Flour: If you don’t have any whole wheat flour on hand, you can leave that ingredient out and use an equal amount of bread flour. Whole wheat flour provides additional depth of flavor to the loaf, but since jalapeño and cheddar are the starts of the show, you may not even notice that the whole grain flour is missing. You can also replace the whole wheat flour with rye flour or spelt flour.
- Using a Different Type of Cheese: It’s best to use a flavorful cheese that will still melt relatively well when baked. Colby jack, pepper jack, and yellow or white cheddar cheese should all work well in this recipe. It’s possible to use sharp cheddar cheese, but it won’t melt as well as “mild” or “medium” cheddar. Also, it’s best to use a block of cheddar that you need to shred and cube yourself. Pre-packaged shredded cheeses contain additives and starches to keep the cheese from sticking together. These additives can negatively affect the flavor and texture of the cheddar-jalapeño sourdough bread.
- Using Pickled Jalapeños instead of Fresh Jalapeños: If desired, you can use pickled jalapeño slices from a jar. Just use the same amount of jalapeños that would roughly equate to a fresh pepper. I include this in the recipe steps below.
Suggested Timeline
Option 1: Room Temperature Proof
| Step | Time |
|---|---|
| Feeding the Sourdough Starter | 10:00 PM (Day 1) |
| Mixing the Dough | 6:00 AM (Day 2) |
| The First Rise (and Adding the Cheddar and Jalapeños) | 6:05 AM |
| Shaping | 12:30 PM |
| The Second Rise (Proofing) | 1:00 PM |
| Scoring and Baking | 3:30 PM |
Option 2: Overnight Cold Proof
| Step | Time |
|---|---|
| Feeding the Sourdough Starter | 10:00 PM (Day 1) |
| Mixing the Dough | 6:00 AM (Day 2) |
| The First Rise (and Adding the Cheddar and Jalapeños) | 6:05 AM |
| Shaping | 12:30 PM |
| The Second Rise (Proofing at Room Temperature) | 1:00 PM |
| The Second Rise (Cold Proofing in the Fridge) | 2:00 PM |
| Scoring and Baking | 8:00 AM (Day 3) |
Ingredient Amounts
Sourdough Starter Feeding
- Sourdough Starter, leftover – 25 grams
- Bread Flour – 50 grams
- Water – 50 grams
Main Dough
- Bread Flour – 400 grams
- Whole Wheat Flour – 50 grams
- Water – 300 grams
- Sourdough Starter, active – 100 grams
- Salt – 10 grams
Inclusions
- Cheddar Cheese – 227 grams (8 oz.), half shredded and half diced
- Jalapeño, fresh – 50 grams, seeded and diced (about one jalapeño)
How to Make Jalapeño-Cheddar Sourdough Bread
Step-by-Step Instructions
Feeding the Starter
- The night before you want to make this bread, take 25 grams of leftover sourdough starter out of the fridge. Feed the starter 50 grams of water and 50 grams of bread flour. Stir everything together thoroughly to combine.
- Cover the starter loosely with a lid and mark the top of the starter with a rubber band so you can see how much it rises. Let the starter rise overnight, for 8-12 hours, until the starter is roughly doubled-in-size. The next morning, your starter should be ready to use.
Note: Using a digital scale is essential for accurately weighing your ingredients. Here is the basic digital scale that I use from Amazon (affiliate link).
Mixing the Dough
- In a mixing bowl, add the water, salt, and 100 grams of sourdough starter. Stir them together with a spoon to thoroughly to dissolve the starter and salt into the water. (Don’t worry about mixing salt and starter together in this way – I’ve never seen it have any noticeable effect on the starter).
- Next, add the whole wheat flour and the bread flour into the bowl.
- Mix all of the ingredients together with a spoon or a bowl scraper until a rough dough is formed and there aren’t any dry bits of flour left.
- Cover the dough with a kitchen towel and let it rest at room temperature for 30 minutes.
The First Rise (and Adding the Cheddar and Jalapeños)
- After the first 30 minute rest, give the dough one set of stretch and folds. Stretch an edge of the dough up into the air with your hands and then fold it over the top of the dough. Go around the bowl repeating the same process 8-12 times until the dough starts to tighten up and feel a little bit smoother.
- Cover up the dough with a kitchen towel and let it rest for another 30 minutes.
- During the next two sets of stretch and folds, you will be adding the jalapeños and cheddar cheese. Make sure your jalapeño pepper is diced finely and the seeds are removed. Finely dice half of the block of cheddar cheese into small pieces (or shred it with the large holes of a cheese grater. Then, dice the other half of the block of cheese into larger cubes, about the size of dice that you play games with.

Note on Pickled Jalapeños: To use pickled jalapeños instead of fresh, weigh out 50 grams of drained, pickled jalapeños. Dice them up finely, like you would for the fresh ones, and then proceed with the recipe as usual.
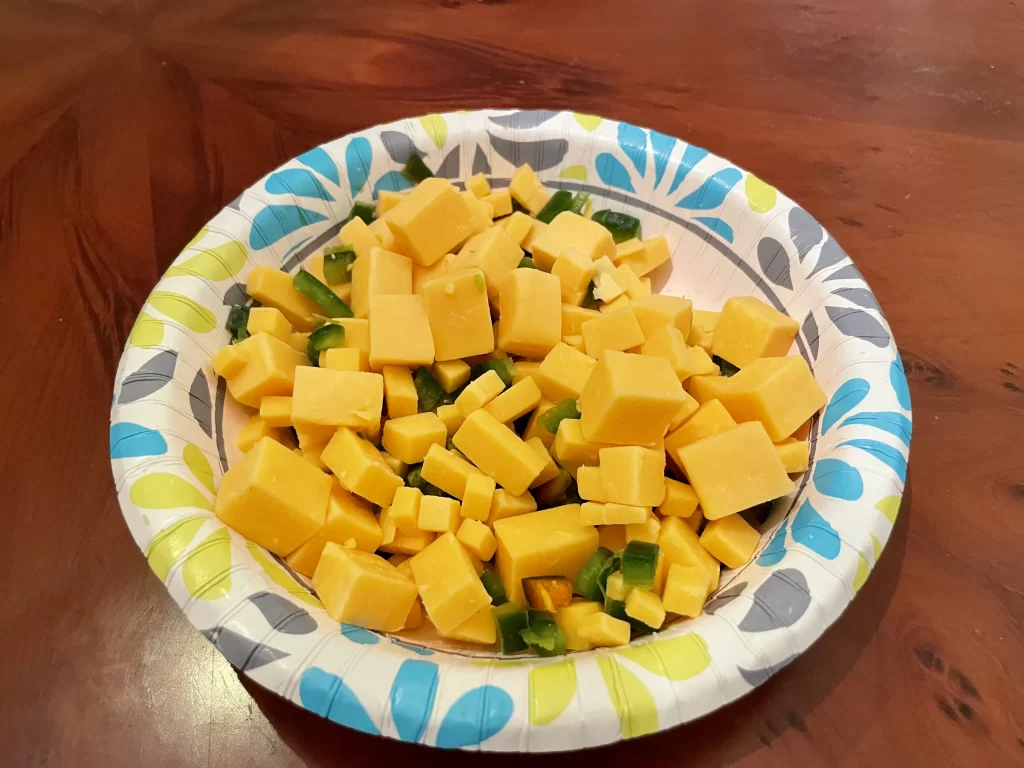
- Mix all of the cheddar and diced jalapeños together in a small bowl. Toss to combine.
- Uncover the dough after its 30 minute rest and place half of the jalapeño-cheddar mixture on top of the dough. With wet fingertips, dimple the cheese and pepper mixture into the dough so that is will stay in place. Then, perform another set of stretch and folds. This time, the stretch and folds will help develop the gluten structure in the dough, and they will also incorporate the cheese and peppers throughout the dough in layers. Do four gentle folds to incorporate the jalapeño-cheddar mixture.
- Cover up the dough and let it rest for another 30 minutes.
- After the 30 minute rest, it’s time for the final set of stretch and folds. Place the remaining cheddar-jalapeño mixture on top of the dough and dimple it in with your fingertips. Gently stretch and fold the dough one last time, incorporating the inclusions throughout the dough as you do.
- Flip the dough over so that it is smooth-side-up and seam-side-down in the mixing bowl. You could also transfer it to a transparent glass container, like my favorite Pyrex bowl (affiliate link).
- Cover up the dough and let it rise at room temperature on your kitchen counter for another 4-8 hours, or until roughly doubled in size.
Shaping
- When the dough has finished the first rise, or bulk fermentation, uncover the dough and transfer it onto the clean kitchen counter. Keep the smooth side up and the seam side down.
- Cup and pull the dough with your hands to form a smooth ball of dough. You can also use a bench scraper to help form the ball of dough. There’s no need to add any flour to the counter at this point.
- Let the dough ball rest, uncovered, for 30 minutes on the kitchen counter. This will allow the gluten to relax and make the dough easier to shape into an oval later.
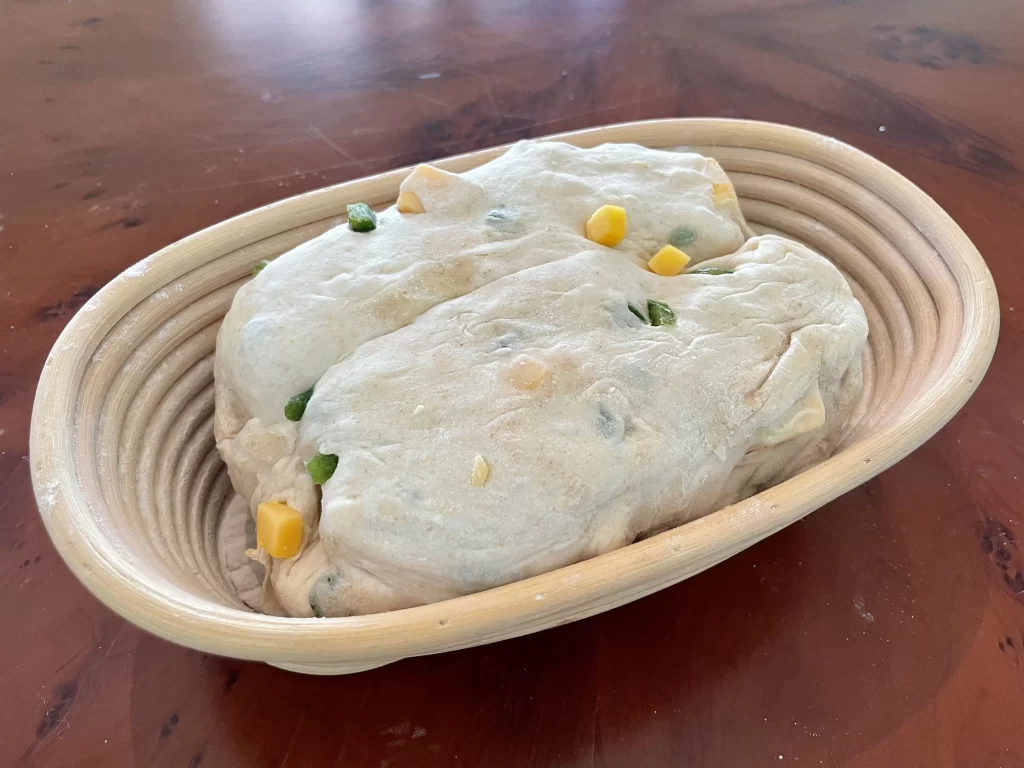
- After the 30 minute rest, dust an oval-shaped banneton basked with rice flour or coarse whole wheat flour, and then shape the dough into a bâtard (an oval-shaped loaf).
- Sprinkle a bit of bread flour on top of the loaf to create a non-stick barrier. Then, flip the dough over so that the sticky side is facing up. Gently stretch the dough into a square shape by tugging on the corners. Fold the right third of the dough over the middle third, and then fold the left third of the dough over the middle third as well. Press down the seam where the two sides meet in the middle.
- Then, start rolling the dough over itself, from the far end to the near end, to create a tight cylinder of dough. The dough should end up as an oblong oval-shaped loaf.
- Optionally, tuck the odd-shaped ends of the loaf underneath the rest of the dough. This will make the sides of the loaf of bread look better once it’s baked.
- Transfer the the dough, upside down, into your oval-shaped banneton basket, and cover it with a kitchen towel. It’s ready to proof.
The Second Rise (Proofing)
- Option 1 – Room Temperature Proof: Let the dough rise on the counter, at room temperature, for 2-3 hours. You should notice significant rise in the loaf in this period of time, gaining around 50% in volume. The room temperature proof is best if you want to have bread the same day that you make the dough. Some people also think the flavor is more mild and less sour with a room temperature proof.
- Option 2 – Cold Proofing in the Fridge: Let the dough rise on the counter, at room temperature, for one hour. This will give the proofing a head-start before you move the dough to the refrigerator. After an hour, move the dough into the fridge for a long, overnight cold proof. Allow the dough to proof in the fridge for 8-24 hours. I usually just take the dough out of the fridge the next day whenever I’m ready to bake it. The cold proofing option allows the dough to develop more complex flavor, some say it’s more sour. The cold dough is also easier to score and handle the next day when you bake it.
Scoring and Baking
- 30 minutes before you’re ready to bake, preheat your oven to 450°F (232°C) with a Dutch oven inside of the oven.
- When the dough has finished proofing, flip it out onto a sheet of parchment paper with the dough right-side-up.
- Score one long slash across the top of the dough with your favorite razor blade or bread lame. For this bread, I used the curved blade on my Baker of Seville lame (affiliate link).
- Transfer the scored dough carefully into your Dutch oven and close the lid.
- Bake for 20 minutes with the Dutch oven lid on, and then remove the lid to release the steam. If everything went correctly, you should notice a beautiful oven spring on your loaf at this point.
- Continue baking for another 15 minutes with the lid off.
- Transfer the finished loaf of jalapeño-cheddar sourdough bread onto a wire rack and allow it to cool for at least one hour before slicing.

I love to enjoy this loaf after only an hour of cooling. By then, the bread is fully cooked on the inside, but the loaf is still slightly warm and the cheese is still a little bit gooey. It’s perfect. You can get a similar melty-cheese effect by toasting slices of this bread the next day in a toaster or toaster oven. Enjoy!
FAQs about Jalapeño-Cheddar Sourdough Bread
To use pickled jalapeños instead of fresh, weigh out 10 grams of drained, pickled jalapeños. Dice them up finely, like you would for the fresh ones, and then proceed with the recipe as usual.
To make a yeasted version of this recipe, replace the sourdough starter in the recipe by adding an additional 50 grams of bread flour and an addition 50 grams of water. Then, add 1/4 tsp of instant yeast to the dough when you add the flour. This yeasted dough may rise slightly faster than the sourdough version, so adjust the rising times accordingly.
Jalapeño-Cheddar Sourdough Bread
This recipe uses the perfect mix of cubed and shredded cheddar cheese to achieve a melty and flavorful loaf of jalapeño-cheddar sourdough bread. The addition of a fresh, diced jalapeño pepper in the dough gives the loaf a spicy flavor that is perfectly balanced by pockets of creamy cheddar cheese dotted throughout the loaf.
Ingredients
Sourdough Starter Feeding
- Sourdough Starter, leftover - 25 grams
- Bread Flour - 50 grams
- Water - 50 grams
Main Dough
- Bread Flour - 400 grams
- Whole Wheat Flour - 50 grams
- Water - 300 grams
- Sourdough Starter, active - 100 grams
- Salt - 10 grams
Inclusions
- Cheddar Cheese – 227 grams (8 oz.), diced
- Jalapeño, fresh – 50 grams, seeded and diced (one single pepper)
Instructions
Feeding the Sourdough Starter
- The night before you want to make this bread, take 25 grams of leftover sourdough starter out of the fridge. Feed the starter 50 grams of water and 50 grams of bread flour. Stir everything together thoroughly to combine.
- Cover the starter loosely with a lid and mark the top of the starter with a rubber band so you can see how much it rises. Let the starter rise overnight, for 8-12 hours, until the starter is roughly doubled-in-size. The next morning, your starter should be ready to use.
Mixing the Dough
- In a mixing bowl, add the water, salt, and 100 grams of sourdough starter. Stir them together with a spoon to thoroughly to dissolve the starter and salt into the water. (Don’t worry about mixing salt and starter together in this way – I’ve never seen it have any noticeable effect on the starter).
- Next, add the whole wheat flour and the bread flour into the bowl.
- Mix all of the ingredients together with a spoon or a bowl scraper until a rough dough is formed and there aren’t any dry bits of flour left.
- Cover the dough with a kitchen towel and let it rest at room temperature for 30 minutes.
The First Rise (and Adding the Cheddar and Jalapeños)
- After the first 30 minute rest, give the dough one set of stretch and folds. Stretch an edge of the dough up into the air with your hands and then fold it over the top of the dough. Go around the bowl repeating the same process 8-12 times until the dough starts to tighten up and feel a little bit smoother.
- Cover up the dough with a kitchen towel and let it rest for another 30 minutes.
- During the next two sets of stretch and folds, you will be adding the jalapeños and cheddar cheese. Make sure your jalapeño pepper is diced finely and the seeds are removed. Finely dice half of the block of cheddar cheese into small pieces (or shred it with the large holes of a cheese grater. Then, dice the other half of the block of cheese into larger cubes, about the size of dice that you play games with.
- Mix all of the cheddar and diced jalapeños together in a small bowl. Toss to combine.
- Uncover the dough after its 30 minute rest and place half of the jalapeño-cheddar mixture on top of the dough. With wet fingertips, dimple the cheese and pepper mixture into the dough so that is will stay in place. Then, perform another set of stretch and folds. This time, the stretch and folds will help develop the gluten structure in the dough, and they will also incorporate the cheese and peppers throughout the dough in layers. Do four gentle folds to incorporate the jalapeño-cheddar mixture.
- Cover up the dough and let it rest for another 30 minutes.
- After the 30 minute rest, it’s time for the final set of stretch and folds. Place the remaining cheddar-jalapeño mixture on top of the dough and dimple it in with your fingertips. Gently stretch and fold the dough one last time, incorporating the inclusions throughout the dough as you do.
- Flip the dough over so that it is smooth-side-up and seam-side-down in the mixing bowl. You could also transfer it to a transparent glass container, like my favorite Pyrex bowl.
- Cover up the dough and let it rise at room temperature on your kitchen counter for another 4-8 hours, or until roughly doubled in size.
Shaping
- When the dough has finished the first rise, or bulk fermentation, uncover the dough and transfer it onto the clean kitchen counter. Keep the smooth side up and the seam side down.
- Cup and pull the dough with your hands to form a smooth ball of dough. You can also use a bench scraper to help form the ball of dough. There’s no need to add any flour to the counter at this point.
- Let the dough ball rest, uncovered, for 30 minutes on the kitchen counter. This will allow the gluten to relax and make the dough easier to shape into an oval later.
- After the 30 minute rest, dust an oval-shaped banneton basked with rice flour or coarse whole wheat flour, and then shape the dough into a bâtard (an oval-shaped loaf).
- Sprinkle a bit of bread flour on top of the loaf to create a non-stick barrier. Then, flip the dough over so that the sticky side is facing up. Gently stretch the dough into a square shape by tugging on the corners. Fold the right third of the dough over the middle third, and then fold the left third of the dough over the middle third as well. Press down the seam where the two sides meet in the middle.
- Then, start rolling the dough over itself, from the far end to the near end, to create a tight cylinder of dough. The dough should end up as an oblong oval-shaped loaf.
- Optionally, tuck the odd-shaped ends of the loaf underneath the rest of the dough. This will make the sides of the loaf of bread look better once it’s baked.
- Transfer the the dough, upside down, into your oval-shaped banneton basket, and cover it with a kitchen towel. It’s ready to proof.
The Second Rise (Proofing)
- Option 1 – Room Temperature Proof: Let the dough rise on the counter, at room temperature, for 2-3 hours. You should notice significant rise in the loaf in this period of time, gaining around 50% in volume. The room temperature proof is best if you want to have bread the same day that you make the dough. Some people also think the flavor is more mild and less sour with a room temperature proof.
- Option 2 – Cold Proofing in the Fridge: Let the dough rise on the counter, at room temperature, for one hour. This will give the proofing a head-start before you move the dough to the refrigerator. After an hour, move the dough into the fridge for a long, overnight cold proof. Allow the dough to proof in the fridge for 8-24 hours. I usually just take the dough out of the fridge the next day whenever I’m ready to bake it. The cold proofing option allows the dough to develop more complex flavor, some say it’s more sour. The cold dough is also easier to score and handle the next day when you bake it.
Scoring and Baking
- 30 minutes before you’re ready to bake, preheat your oven to 450°F (232°C) with a Dutch oven inside of the oven.
- When the dough has finished proofing, flip it out onto a sheet of parchment paper with the dough right-side-up.
- Score one long slash across the top of the dough with your favorite razor blade or bread lame. For this bread, I used the curved blade on my Baker of Seville lame.
- Transfer the scored dough carefully into your Dutch oven and close the lid.
- Bake for 20 minutes with the Dutch oven lid on, and then remove the lid to release the steam. If everything went correctly, you should notice a beautiful oven spring on your loaf at this point.
- Continue baking for another 15 minutes with the lid off.
- Transfer the finished loaf of jalapeño-cheddar sourdough bread onto a wire rack and allow it to cool for at least one hour before slicing.
Notes
- Using a Digital Scale: Using a digital scale is ideal for accurately weighing your ingredients. I just use a basic digital scale that I bought on Amazon.
- Using Pickled Jalapeños: To use pickled jalapeños instead of fresh, weigh out 50 grams of drained, pickled jalapeños. Dice them up finely, like you would for the fresh ones, and then proceed with the recipe as usual.
- How to Enjoy: I love to enjoy this loaf after only an hour of cooling. By then, the bread is fully cooked and cooled, but the loaf is still slightly warm and the cheese is still a little bit gooey. This bread is wonderful to enjoy on its own, with a slather of butter, or for an insanely over-the-top grilled cheese sandwich. Enjoy!