Here’s why I decided to make sourdough dinner rolls for the first time… Growing up the Midwest, dinner rolls were never missing from our table at Thanksgiving or Christmas dinners. Soft and fluffy yeast-raised rolls always seemed to be the perfect accompaniment to a hearty holiday meal, but they always lacked flavor! Sure, they’re great with butter and jam, but my dad even used to joke that dinner rolls are just “filler” and we shouldn’t waste precious stomach-space on flavorless bread when there are plenty of holiday favorites to be enjoyed. That is not the case with these sourdough dinner rolls. They are soft, fluffy, and bursting with flavor!
Last Thanksgiving, after I had already dived head-first into the world of sourdough bread, I decided to see if I could make dinner rolls from my new sourdough starter without using any commercial yeast. I was hoping they would turn out well and at least be somewhat comparable to the dinner rolls I was used to. When I tried them I was blown away! The resulting rolls were just as buttery and soft as yeasted rolls, but with a slight tang and flavor boost from the natural leavening that you just can’t get with yeast rolls. I knew that I had stumbled on a new holiday favorite.
So, the holidays are almost upon us. Give these sourdough dinner rolls a try! I guarantee you’ll love them. Below you’ll find the full recipe, video tutorial, and two suggested timetables for how you can fit the making of these rolls into your busy holiday schedule. Also, if you want to make a sourdough starter from scratch, click here for my free guide. Enjoy!
Timetables: Fitting These Sourdough Dinner Rolls Into Your Schedule
The holidays can be a busy time. Since these sourdough dinner rolls require more time to rise than traditional rolls, a little planning ahead can go a long way. Here are three different ways that you can make these sourdough dinner rolls fit into your schedule!
The Overnight Starter Feeding:
Day 1: Feed your starter in the evening before you go to bed.
Day 2: Mix the dough in the morning, bulk ferment, shape, proof, and bake the rolls the same day. You can also refrigerate the dough after bulk fermentation and shape, proof and bake on day 3.
The Overnight Warm Bulk Ferment (what I usually do):
Day 1: Feed your starter in the afternoon or early evening. Your starter should be ready to use in 4-5 hours. Before you go to bed mix and knead the dough and let it bulk ferment on the kitchen counter overnight for about 8 hours.
Day 2: The next morning, shape the rolls, proof them, and bake them on the same day.
The Overnight Cold Bulk Ferment (from this video):
Day 1: Feed your starter in the morning. It should be ready to use in 4-5 hours. When the starter is ready, mix and knead the dough and let it bulk ferment on the kitchen counter for about 4-8 hours, until doubled in size. When the dough has doubled, move it to the fridge where it can rest until the next day. The cold environment of the fridge will keep the dough from over-proofing.
Day 2: The next morning, remove the dough from the fridge and let the dough come back up to room temperature on the counter. Shape the rolls, proof them, and bake them on the same day.
Some of My Favorite Baking Tools (Affiliate Links):
Baker of Seville Bread Lame
Oval Banneton Basket
Non-Stick Bread Pan
Non-Stick Focaccia Pan
Ingredients
Bread Flour/All-Purpose Flour……………..450g
Whole Milk…………………………………………….250g
Sugar………………………………………………………25g
Butter (Melted)………………………………………57g
Salt………………………………………………………….10g
Sourdough Starter…………………………………100g
Feeding Your Starter for Sourdough Dinner Rolls
For feeding your starter, you have two options based on the timetable that you’re following:
Feeding the Starter in the Morning or Afternoon: Take 25g of sourdough starter out of the fridge and feed it 50g of water and 50g of bread flour. In about four or five hours the starter should have doubled and be ready to use!
The Overnight Starter Feeding: take 10g of starter out of the fridge and feed it 50g of water and 50g of bread flour right before you go to bed. In the morning it should have doubled and be ready to use.
Mixing and Kneading the Dough
- Once your sourdough starter has doubled in size and is ready to use, mix all of the ingredients together in a mixing bowl. Using a digital scale to weigh all the ingredients is best for accuracy.
- Stir all of the ingredients with a bowl scraper or a wooden spoon until a shaggy dough forms.
- Transfer the dough onto a dry counter or into the bowl of a stand mixer with the dough-hook attachment.
- Knead for 8-10 minutes by hand, or on speeds 1 and 2 for about 8 minutes. When using the mixer, start on speed one and then move to speed two once you notice the machine start slowing down.
- After about 8 minutes of kneading the dough should be pulling away from the sides of the bowl and should hold together.
Bulk Fermentation (The First Rise)
- Remove the dough from the mixing bowl and form it into a smooth ball with your hands.
- Spray the mixing bowl with oil and place the dough seam-side-down into the bowl. Spray the top of the dough with oil and cover it with a skin-tight layer of plastic wrap. This will keep the dough from drying out and forming a skin as it rises.
- Let the dough bulk ferment (rise) for 4-8 hours, or until about doubled in size.
- When the dough has risen, you can either shape the rolls right away or move the dough to the fridge and you can shape the rolls the following day. Take your pick! Whatever works for your schedule. The cold temperature of the fridge really slows down the sourdough fermentation, so don’t worry about over-proofing.
Diving and Shaping Your Sourdough Dinner Rolls
- If you moved your dough to the fridge, take it out and leave it on the counter for 30 minutes so it can come back up to room temperature.
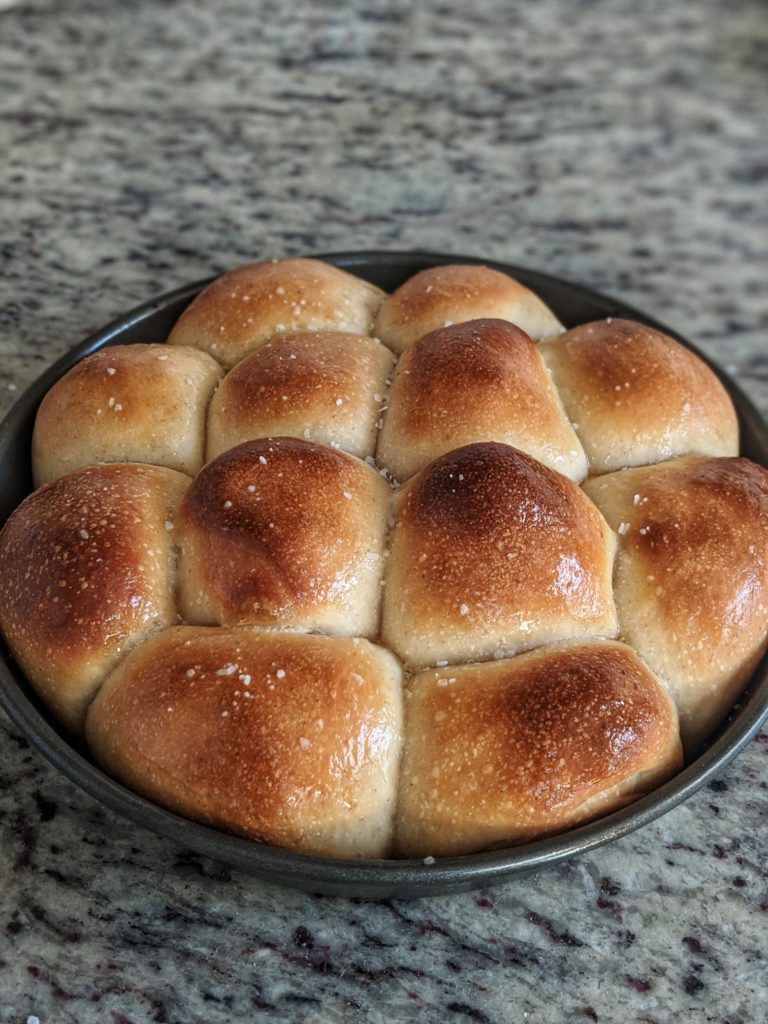
- Grab an 8-inch round pie pan or a 9-inch square cake pan and grease it with oil or butter. A square pan is really the perfect size for these rolls, but for some reason I enjoy trying to fit all the rolls into a round pan. The square pan makes the rolls look prettier and more uniform, but the round pan makes the rolls look more homemade. Take your pick!
- Once your dough is at room temperature, or at least a little bit warmer, turn the dough out, upside down, onto a floured counter.
- Divide the dough into twelve pieces with a bench scraper or knife. Get them as close to the same size as you can. This recipe should yield twelve 75 gram pieces.
- Shape each piece of dough into a ball with the seam pinched closed at the bottom and a smooth, rounded off top. See the video for my exact method of shaping these rolls.
- Place each round roll into the greased pan with the seam size down. Fit all twelve of the rolls into the pan so that they are evenly spaced out. They might be touching or not touching depending on the size of your pan.
Proofing (The Second Rise)
- Spray the rolls with oil or non-stick spray and cover the pan with oiled plastic wrap. The oil will ensure that the plastic doesn’t stick to the rolls.
- Let the rolls proof (rise) for 4-8 hours, or until doubled in size. They should keep proofing until they are almost the size of full-sized dinner rolls. I find that with soft rolls and burger buns, it’s best to let them proof to 90% of their size, there shouldn’t be much oven spring when baking. This will keep them nice and soft and smooth on top when they come out of the oven.
Baking Your Sourdough Dinner Rolls
- Pre-heat your oven to 375 degrees F about 30 minutes before the rolls are done proofing.
- Once the rolls are doubled in size and have filled the pan, brush the tops of the rolls with egg wash. One beaten egg should be more than enough. The egg wash will help the rolls brown nicely in the oven and give them a classic, golden-brown look.
- Bake for 25-30 minutes at 375 degrees F. Turn the pan once during the middle of baking to ensure even browning.
- Remove the pan from the oven when the rolls are done and brush the tops with melted butter. Optionally add a sprinkle of flaky sea salt for an extra special touch.
- Remove the rolls from the pan and place on a cutting board or wire rack so they can cool. You can either serve them warm or when they’ve have a chance to cool.
Serving the Sourdough Dinner Rolls
Serve these delicious rolls alongside any holiday feast. Butter and jam are a welcome addition, but even on their own they taste amazing! They’re buttery, fluffy, and have just the slightest tang from the sourdough starter. Give this recipe a shot this year and I guarantee you’ll love it! Just don’t be surprised when the dinner rolls steal the show.