This recipe for Sourdough English Muffins is an absolute winner. With only five ingredients, the dough is quick to throw together, and it can easily be modified to use the ingredients you have on hand. This is also a true sourdough recipe – no yeast!

Why This Recipe Works
- Only 5 Ingredients: You can make delicious, nook-and-cranny-filled sourdough English muffins with just flour, water, salt, starter, and a sweetener. That’s only five ingredients, but since sourdough starter is already made up of flour and water, I guess you technically only need four ingredients for this recipe!
- Lean Dough: Many English muffin recipes will ask you to add dairy, eggs, oil, or butter to the dough. These ingredients make for a luxurious enriched dough, but making great English muffins comes down to the fermentation, the shaping, and the cooking technique – the ingredients are secondary. You really can make great sourdough English muffins with a lean bread dough like this one.
- No Rolling and Cutting: Instead of rolling the dough flat with a rolling pin and cutting out circles with a biscuit-cutter, this recipe calls for making a dozen balls of dough and flattening them into English muffin shapes with your hand. You’ll achieve an almost identical result in the end with no wasted dough scraps.
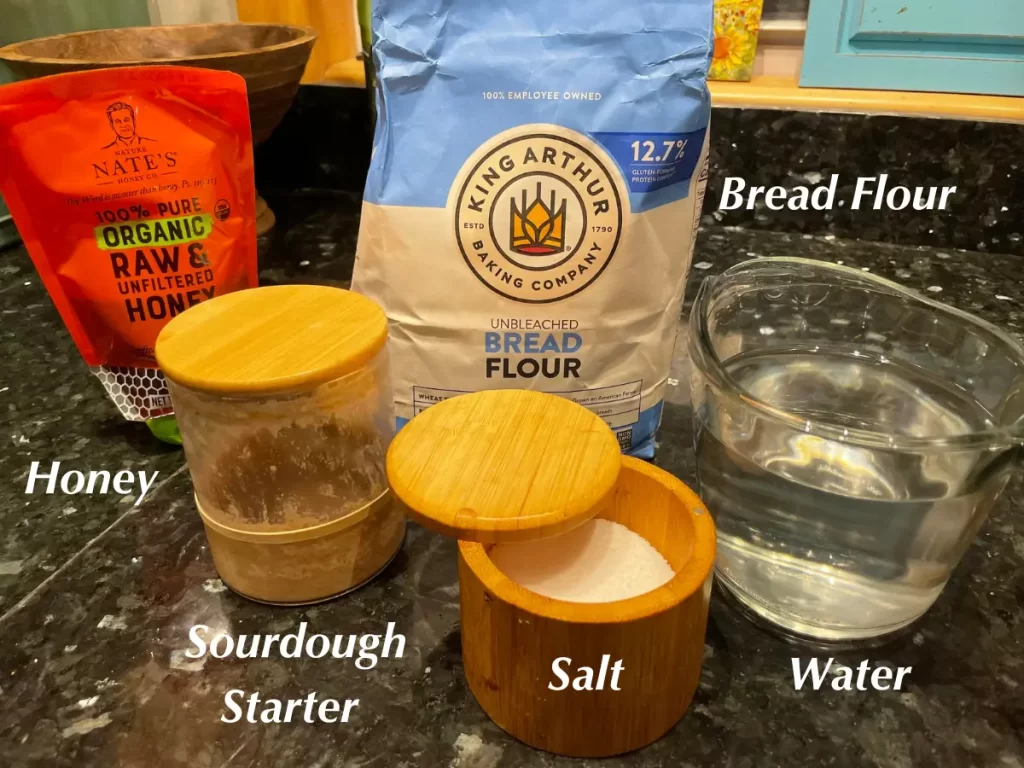
Ingredients You’ll Need
- Bread Flour: I use King Arthur brand of bread flour here in the US. Any type of wheat-based, white flour should work if it has around 13% protein content.
- Water: Plain, unchlorinater tap water is best. Use filtered water or bottled spring water if your city’s tap water contains harsh ingredients or has a bad taste.
- Sourdough Starter: For this recipe, I used my regular sourdough starter that I fed with whole wheat flour. You can use a whole wheat starter, a white flour starter, or any other starter that you prefer, as long as it is 100% hydration (equal parts water and flour by weight). The amount of starter in the dough will be relatively small, so the type of flour you use won’t make much of a difference.
- Salt: I prefer to use plain sea salt or kosher salt for baking sourdough breads. Some people avoid using iodized salt in baking, but it hasn’t been shown to cause too many problems. Use what you have!
- Honey: English muffins usually contain a small amount of sweetener. This recipe utilizes honey, which adds a light sweetness to the finished product, as well as a slight softness to the dough. For alternatives to honey, check the substitutions below.
- Cornmeal (Only for Dusting): This ingredient is characteristic of English muffins in the USA and it is used mainly for dusting the dough after shaping.
Note: See recipe card below for full ingredient amounts and quantities.
Substitutions and Additions
- Instead of bread flour, you can use all-purpose flour. In US grocery stores, AP flour still has a relatively high protein content. To replace bread flour in this recipe with all-purpose flour, simply swap out the flours at a 1:1 ratio, and then reduce the amount of water in the recipe by 10 grams (290 grams total instead of 300 grams). This will counteract the slightly lower protein content.
- You can swap up to half of the water in this recipe for milk. Although the English muffins are fine with just water, using some milk will add an extra softness and richness to the dough.
- Instead of honey, you can use white sugar, brown sugar, or molasses at a 1:1 ratio. This is a great way to to replace a non-vegan ingredient with a plant-based ingredient to make vegan sourdough English muffins.
- You can use semolina flour in place of cornmeal for dusting. This ingredient seems to be more common in UK English muffin recipes than cornmeal. It gives the final product a slightly-less-crunchy exterior while still serving the non-stick purpose of cornmeal.
Suggested Timeline
| 3:00 PM | Feeding the Sourdough Starter |
| 10:00 PM | Mixing the Dough |
| 10:05 PM | Kneading (by Hand or Stand Mixer) |
| 10:15 PM | Bulk Fermentation (The First Rise) |
| 6:45 AM | Shaping |
| 7:00 AM | Proofing |
| 9:00 AM | Cooking |
Dough Ingredients
- Bread Flour – 475 grams
- Water – 300 grams
- Sourdough Starter (Active) – 50 grams
- Salt – 10 grams
- Honey – 10 grams
- Cornmeal (Only for Dusting)
Step-by-Step Instructions
Feeding the Sourdough Starter
- Take a tablespoon, or 25 grams, of sourdough starter out of the fridge. Feed it 25 grams of water and 25 grams of whole wheat flour. Mix everything together until no dry bits of flour remain. Mark the top of the starter with a rubber band, close the lid loosely, and let the starter rise for 4-8 hours, or until it has doubled in size. Once it has grown to about double in size, it’s ready to use in the dough.
Mixing the Dough
- In a mixing bowl, add 300 grams of water, 50 grams of sourdough starter, 10 grams of salt, and 10 grams of honey or other sweetener. Stir the liquid ingredients together until dissolved.
- Add 475 grams of bread flour to the mixing bowl. Stir the flour into the liquid ingredients until a rough dough is formed.
Kneading (by Hand or Stand Mixer)
- To knead by hand, transfer the dough onto the kitchen counter and knead for 8-10 minutes until the dough is smooth. Don’t add any additional flour to the counter while you are kneading.
- If using a stand mixer, transfer the dough into the bowl of the stand mixer and turn the machine on to the lowest setting for one minute. When the dough comes together, increase the speed to medium and allow the dough to knead for 6-8 more minutes.
- After kneading, form the dough into a smooth ball inside of the mixing bowl and cover the bowl up with a kitchen towel.
Bulk Fermentation (The First Rise)
- Let the dough rise at room temperature on the counter overnight. It should take between 6-10 hours for the dough to double in size. I usually just let the dough rise while I’m asleep, and then I shape it the next morning. If your dough is doubled in size, or at least visibly puffed up with air the next morning, move on to the next step.
Shaping
- Take the risen dough out of the mixing bowl and transfer it onto a floured surface on your counter. Get flour on both sides of the dough so that it is easier to handle.
- Divide the dough into 12 equally-sized pieces with a bench scraper or a chef’s knife. Each piece of dough should be weighted to approximately 70 grams if you’re using a digital scale.
- Dip a piece of dough in flour on one side, then stretch and fold the piece of dough into a tight ball. Roll the ball on the counter to smooth off the edges and place the ball off to the side. Repeat until all of the dough balls are formed.
- Prepare a baking sheet by lining it with parchment paper, and then dusting the parchment paper with coarsely-ground cornmeal. The parchment paper isn’t absolutely necessary since these muffins will be cooked in a different pan, so you can dust the baking sheet with cornmeal directly if you want to.
- Place each ball of dough onto the cornmeal-lined baking sheet, leaving more than an inch of space between each ball. Press down the dough balls with your hand to make them flat, and then sprinkle the top of each dough ball with more cornmeal.
Proofing
- Cover up the sourdough English muffins with a kitchen towel or plastic wrap and allow them to rise at room temperature for 2-3 hours.
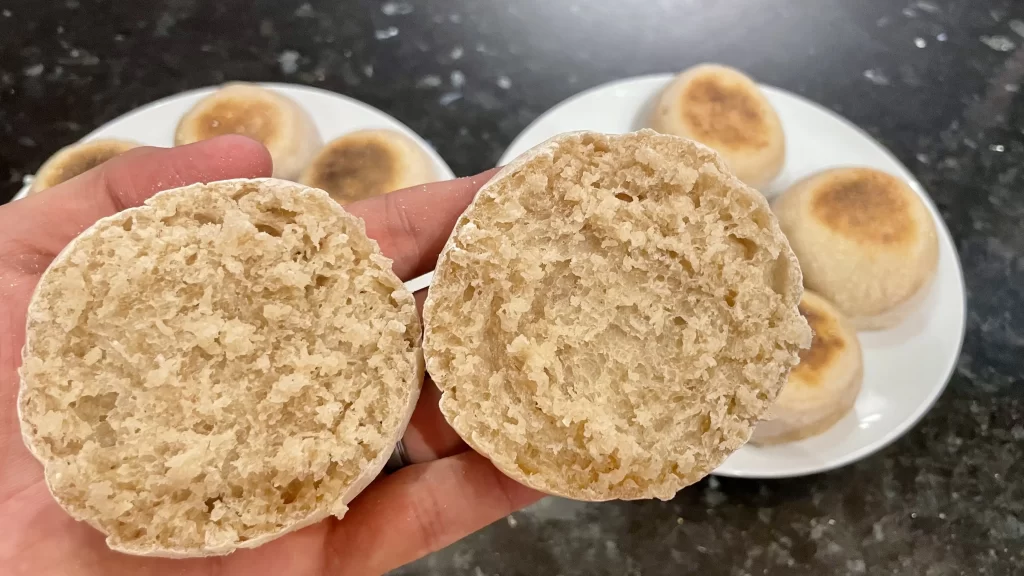
- After fully proofing, the muffins should rise to about double their original size, and they should seem puffy and light. This final proofing stage is key for getting the classic “nook-and-cranny” interior that English muffins are famous for.
- If after two hours, the dough balls seem not to have risen very much, move them to a warmer place and give them another hour of proofing time.
Cooking
- Preheat a well-seasoned cast-iron skillet over low-to-medium heat. The heat should be high enough that the skillet will cook an English muffin half way through in eight minutes, but low enough that it won’t burn the exterior of the muffin in those same eight minutes.
- Place half of the muffin discs directly onto the surface of the preheated cast-iron skillet. Cook them for 8 minutes on the first side. Check the discs about 1-2 minutes into the cooking time to see if they have sealed properly on the cooking side. Ideally they will have sealed and you’ll be able to slide them around the pan. If any of the doughs have stuck to the pan, try to remove them carefully without ripping the muffin.
- After 8 minutes, flip each English muffin over to the other side. The cooked side should be lightly golden-brown. Continue cooking for another 8 minutes on the other side. When the muffins have fully cooked, give them a little more heat on each side until you’ve got the exactly color you want, and then transfer them to a wire rack to cool.
- Optionally, you can cook the muffins for 3-4 minutes per side on medium heat until they are golden brown on the outside. Then, transfer them to a preheated oven to bake for 10-15 minutes at 350°F (180°C). This skillet-oven-combo is an easier way to achieve the desired crust color that you are looking for without having to worry as much about keeping the stove heat low.
Eating
- After cooling for 10-20 minutes, pierce one of the sourdough English muffins around the outside with the tines of a fork. Peel the English muffin open to reveal all of the nooks and crannies. While there won’t be any holes throughout the dough, you should notice a bumpy, jagged surface
- Serve with butter, jam, or marmalade for the best way to enjoy these English muffins fresh from the oven.
Serving Tips
- Split these sourdough English muffins open with a fork instead of by cutting them with a butter knife. This will preserve the jagged interior.
- Eat English muffins fresh from the oven, un-toasted, with a slather of butter and your favorite jam.
- If you’re saving these English muffins for the next day, it’s best to serve them toasted. An egg, ham, and cheese sandwich is also great on a toasted muffin the next day.
Storage
- Room Temperature: These English muffins can be stored for 2-3 days at room temperature on the counter, in a bread box, or in an airtight container/sealed plastic bag. These are best served within a few hour or days of cooking. When storing at room temperature, check daily for mold growth, and discard if any mold is visible.
- Freezer: To store in the freezer, place whole or split sourdough English muffins in an airtight, sealed plastic bag. Remove as much air as possible from the bag and store muffins in the freezer for up to a month. Allow muffins to thaw in the fridge overnight the night before you plan to eat them.
Yield: 12 English Muffins
5-Ingredient Sourdough English Muffins

You'll be surprised at how easy these Sourdough English Muffins are to make. They're made from real sourdough (no yeast), they contain just 5 ingredients, and you can even make them vegan.
Prep Time
25 minutes
Cook Time
16 minutes
Additional Time
12 hours
Total Time
25 minutes
Ingredients
- Bread Flour - 475 grams
- Water - 300 grams
- Sourdough Starter (Active) - 50 grams
- Salt - 10 grams
- Honey - 10 grams
- Cornmeal (Only for Dusting)
Instructions
Feeding the Sourdough Starter
- Take a tablespoon, or 25 grams, of sourdough starter out of the fridge. Feed it 25 grams of water and 25 grams of whole wheat flour. Mix everything together until no dry bits of flour remain. Mark the top of the starter with a rubber band, close the lid loosely, and let the starter rise for 4-8 hours, or until it has doubled in size. Once it has grown to about double in size, it's ready to use in the dough.
Mixing the Dough
- In a mixing bowl, add 300 grams of water, 50 grams of sourdough starter, 10 grams of salt, and 10 grams of honey or other sweetener. Stir the liquid ingredients together until dissolved.
- Add 475 grams of bread flour to the mixing bowl. Stir the flour into the liquid ingredients until a rough dough is formed.
Kneading (by Hand or Stand Mixer)
- To knead by hand, transfer the dough onto the kitchen counter and knead for 8-10 minutes until the dough is smooth. Don’t add any additional flour to the counter while you are kneading.
- If using a stand mixer, transfer the dough into the bowl of the stand mixer and turn the machine on to the lowest setting for one minute. When the dough comes together, increase the speed to medium and allow the dough to knead for 6-8 more minutes.
- After kneading, form the dough into a smooth ball inside of the mixing bowl and cover the bowl up with a kitchen towel.
Bulk Fermentation (The First Rise)
- Let the dough rise at room temperature on the counter overnight. It should take between 6-10 hours for the dough to double in size. I usually just let the dough rise while I’m asleep, and then I shape it the next morning. If your dough is doubled in size, or at least visibly puffed up with air the next morning, move on to the next step.
Shaping
- Take the risen dough out of the mixing bowl and transfer it onto a floured surface on your counter. Get flour on both sides of the dough so that it is easier to handle.
- Divide the dough into 12 equally-sized pieces with a bench scraper or a chef’s knife. Each piece of dough should be weighted to approximately 70 grams if you’re using a digital scale.
- Dip a piece of dough in flour on one side, then stretch and fold the piece of dough into a tight ball. Roll the ball on the counter to smooth off the edges and place the ball off to the side. Repeat until all of the dough balls are formed.
- Prepare a baking sheet by lining it with parchment paper, and then dusting the parchment paper with coarsely-ground cornmeal. The parchment paper isn’t absolutely necessary since these muffins will be cooked in a different pan, so you can dust the baking sheet with cornmeal directly if you want to.
- Place each ball of dough onto the cornmeal-lined baking sheet, leaving more than an inch of space between each ball. Press down the dough balls with your hand to make them flat, and then sprinkle the top of each dough ball with more cornmeal.
Proofing
- Cover up the sourdough English muffins with a kitchen towel or plastic wrap and allow them to rise at room temperature for 2-3 hours.
- After fully proofing, the muffins should rise to about double their original size, and they should seem puffy and light. This final proofing stage is key for getting the classic “nook-and-cranny” interior that English muffins are famous for.
- If after two hours, the dough balls seem not to have risen very much, move them to a warmer place and give them another hour of proofing time.
Cooking
- Preheat a well-seasoned cast-iron skillet over low-to-medium heat. The heat should be high enough that the skillet will cook an English muffin half way through in eight minutes, but low enough that it won’t burn the exterior of the muffin in those same eight minutes.
- Place half of the muffin discs directly onto the surface of the preheated cast-iron skillet. Cook them for 8 minutes on the first side. Check the discs about 1-2 minutes into the cooking time to see if they have sealed properly on the cooking side. Ideally they will have sealed and you’ll be able to slide them around the pan. If any of the doughs have stuck to the pan, try to remove them carefully without ripping the muffin.
- After 8 minutes, flip each English muffin over to the other side. The cooked side should be lightly golden-brown. Continue cooking for another 8 minutes on the other side. When the muffins have fully cooked, give them a little more heat on each side until you’ve got the exactly color you want, and then transfer them to a wire rack to cool.
- Optionally, you can cook the muffins for 3-4 minutes per side on medium heat until they are golden brown on the outside. Then, transfer them to a preheated oven to bake for 10-15 minutes at 350°F (180°C). This skillet-oven-combo is an easier way to achieve the desired crust color that you are looking for without having to worry as much about keeping the stove heat low.
Eating
- After cooling for 10-20 minutes, pierce one of the sourdough English muffins around the outside with the tines of a fork. Peel the English muffin open to reveal all of the nooks and crannies. While there won’t be any holes throughout the dough, you should notice a bumpy, jagged surface that is perfect for holding onto spreads.
- Serve with butter, jam, or marmalade for the best way to enjoy these English muffins fresh from the oven.
Notes
- Split these sourdough English muffins open with a fork instead of by cutting them with a butter knife. This will preserve the jagged interior.
- Eat English muffins fresh from the oven, un-toasted, with a slather of butter and your favorite jam.
- When saving these English muffins for the next day, it’s best to serve them toasted. An egg, ham, and cheese sandwich is also great on a toasted muffin the next ay.